User manual (EN)
The Surface Solutions manual provides a comprehensive and structured overview of all the platform’s features. It explains step by step how to create, manage, and edit calculations, quotes, invoices, customers, and orders, and describes the document definition process for customized PDFs and email distribution. The goal is to help users quickly find their way around, implement processes efficiently, and use the software safely and consistently across all organizational workflows. Thus, the manual serves both as an introduction for new users and as a reference guide for experienced ones.
- Registration & Setup
- Calculations
- Offer
- Order
- Invoice
- Overview
- Create Invoice
- Invoice Overview
- Canceling Invoices
- Create Credit Notes
- Export Invoices in Bulk
- Customer
- Suppliers & Purchases
- Inventory management
- Document definition
Registration & Setup
Overview
The chapter “Registration and Setup” describes the introduction to Surface Solutions – from creating a new user account to fully configuring the company profile.
First, it explains how to register via the website, activate your account, and then log in to the application. This is followed by the setup process, which starts automatically upon the first login and guides you step by step through all relevant company information.
Once the setup is complete and the company profile is fully configured, you can immediately begin working in Surface Solutions – creating offers, performing calculations, and managing orders.
Registration
Registration for Surface Solutions is done via the website surface-solutions.com
Click the button “Try for free” to access the registration form.

In the registration form, enter the following information:
-
Email address
-
First name
-
Last name
-
Password
-
Language
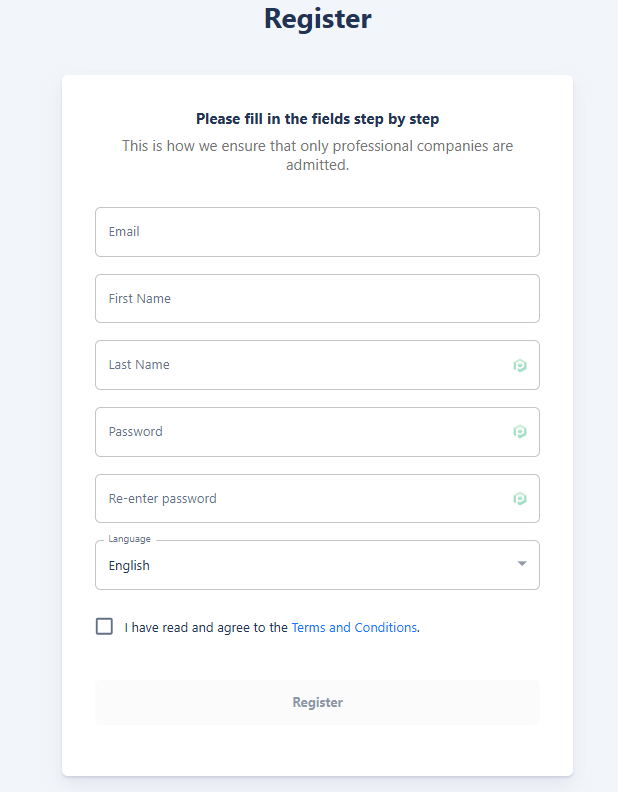
All fields are mandatory and must be completed to finish the registration process.
The selection of the language is particularly important, as it defines the organization language. It determines the language used for default texts in calculations, offers, invoices, and other documents. Changing the organization's language afterwards is only possible via the support team. The user interface language, however, can be customized individually by each user.
After completing the form, click “Register” to finish the process.
You will then be redirected to a confirmation page, where you will find a link to the login page. Use this link to log in with your newly created credentials, and you will then automatically be taken to the setup page to configure your organization.
Initial Setup
After successful registration and the first login, the user is automatically guided through the setup process. The goal of this step is to fully configure the company profile so that Surface Solutions can correctly configure all functions and documents. The setup process consists of ten consecutive steps in which all relevant company information is collected.


1. Company Name
In the first step, the full company name is entered as it appears in the commercial register. This information will later appear on all automatically generated documents, such as offers, invoices, and purchase orders.
2. Company
In the second step, the company address as well as country, postal code, and city are entered. These details are used by default as sender information on documents and can be adjusted later if needed.
3. Localization
Here, the language and currency of the organization are defined.
The selected language determines the language in which document definitions and standard texts are created in Surface Solutions.
The currency defines the unit in which all calculations, offers, and invoices are managed by default.
4. Contact
In the “Contact” step, the general contact information of the company is recorded. This includes a contact person, a phone number, and an email address.
It is recommended to use a functional address such as info@my-coating-company.com so customer responses can be managed centrally.
5. Company Logo
In this step, the company logo can be uploaded. This logo is automatically printed on all relevant documents, such as offers, orders, and invoices, and can be adjusted or replaced at any time.
6. Company Data
Here, the company’s legal information, such as VAT identification number and commercial register number, is entered. If this information is not available, a checkbox can be used to confirm that no such data exists.
7. Bank Details
In this step, the company’s bank account information is entered.
This information is used exclusively for display on documents (e.g., invoices) and is not used for payment purposes within the platform.
8. Team Members
Additional users can be added to the organization here.
For each team member, first name, last name, and email address are entered.
Invited persons automatically receive an email with a link enabling them to set their password and gain access to the organization.
9. Key Figures
This step is used to enter basic company metrics.
The provided values are used exclusively internally and anonymized for statistical evaluations to continuously improve the platform and its functions.
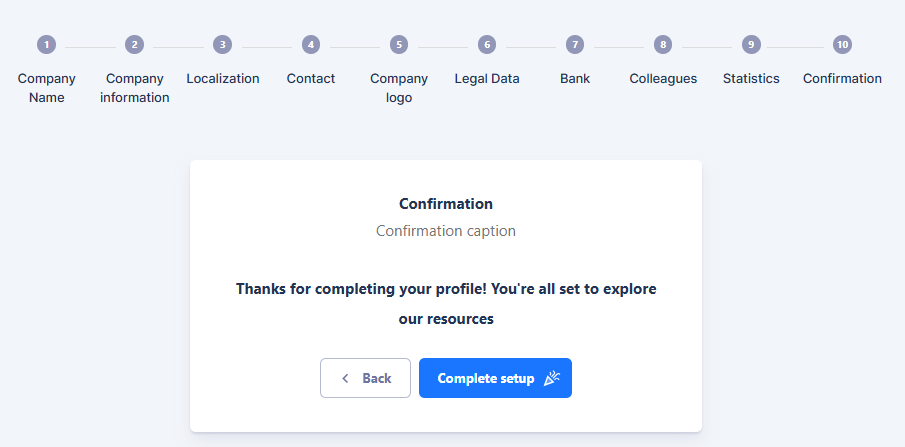
10. Confirmation
In the final step, all information is reviewed. By clicking “Set up company profile”, the profile is created.
From this moment, the company profile is fully set up, and the user can immediately begin making full use of Surface Solutions.
Calculations
Overview
The calculations in Surface Solutions are the central tool for performing all computations for your coating projects efficiently, consistently, and transparently. They make it possible to manage offers, positions, and items in a structured way, carry out calculations automatically, and apply individual adjustments.
With the calculations, you can:
The calculations are modular in structure and consist of several areas:
Thus, the calculations provide an end-to-end solution that covers everything from defining the calculation logic and managing items to creating calculations and offers.
By combining the overview, editor, definition, and item database, it is ensured that calculations can be performed accurately, transparently, and flexibly—regardless of how complex the items or orders are.
Calculation Overview
The Calculation Overview is the central entry point in Surface Solutions.
Here, you can see all existing calculations in a clear card view.

Structure of the Overview
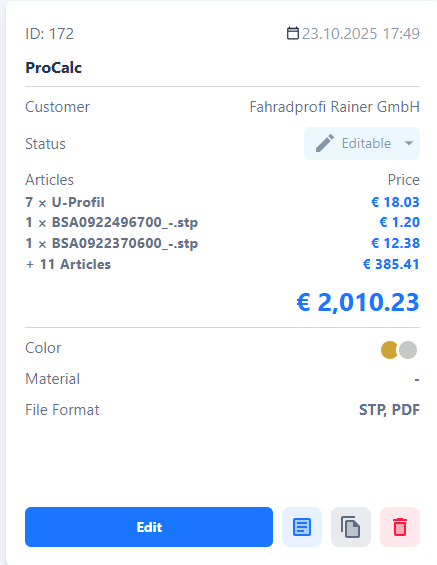
Each calculation is displayed as a card.
A card shows the most important information about the respective calculation at a glance:
-
Name of the calculation
-
Creation date
-
Customer
-
Items included in the calculation
-
Additional details (e.g., status or internal notes)
The cards are designed so that all relevant information can be quickly recognized without having to open the calculation.
Create New Calculation
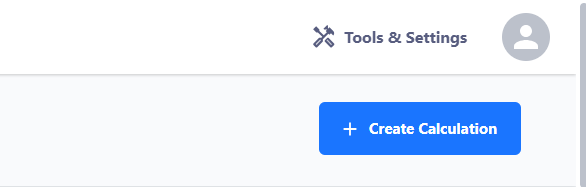
At the top right of the Calculation Overview is the "Create Calculation" button.
You can use this button to create a new calculation.
This step is typically performed when a new customer request is received.
After clicking, the input form opens, where you can enter all relevant information for the new calculation.
Calculation Editor
The Calculation Editor is the heart of Surface Solutions.
Here, new calculations are created, edited, and managed.
The editor provides a detailed overview of all relevant information, customer and item data, as well as the ability to configure positions and surcharges individually.
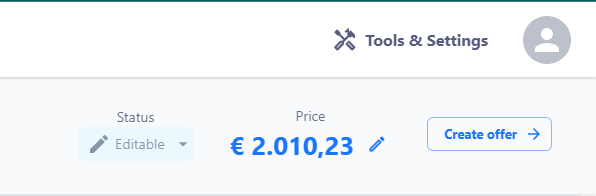
Header in the Calculation Editor
In the upper section of the page (overview row), the most important general information is displayed:
-
Creation date of the calculation
-
Status
-
Name of the calculation
-
Total price (top right)
Once a calculation is completed, the "Create Offer" button also appears at the top right.
This button is available when a customer has already been assigned to the calculation and at least one position exists.

The Create Offer function is described in detail in the Offers chapter.
Overview of the Calculation
Below the overview row, the general information about the calculation is displayed.
Customer Data (left)
On the left side, the customer data is displayed.
Using the "Edit Customer" button, you can view and adjust all information related to the customer:
-
Company Name
-
Address
-
Contact Person
-
Email Address and Phone Number
-
Tax Information (e.g., VAT Identification Number)
If a customer already exists in the system, it is sufficient to enter the first few letters of the name.
The system will then automatically suggest matching customers, which can be selected.
Using the "Create New Customer" button, you can also create a new customer directly within the Calculation Editor.

Additional Options (right)
On the right side, various functions are available:
-
Download CSV – Exports all information recorded in the calculation.
-
Manage Attachments – Allows uploading and downloading files, such as drawings or additional information.
-
Surcharge Fields – These fields apply to the entire calculation and include values such as:
-
Number of color changes
-
Total material costs
-
Total discount or total surcharges
-
Setup costs
-
Other flat-rate cost components
-
These fields affect the total price of the calculation, not individual positions. You can adjust these fields independently in the calculation definition.

Positions in the Calculation
Below the general information, all positions of the calculation are displayed.
Each position corresponds to a single item to be coated.
Add New Position
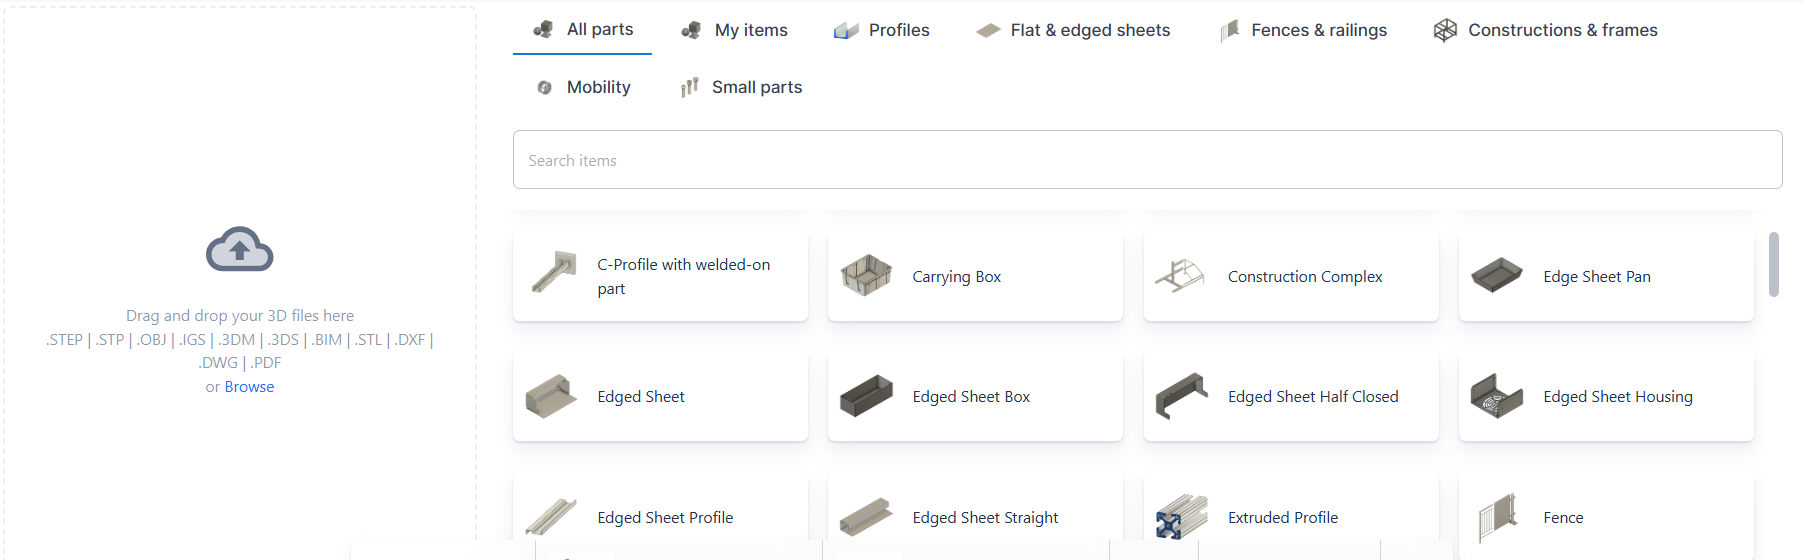
You can create a new position in two ways:
- Via Drag & Drop
Upload a 3D file or a technical drawing (e.g., in PDF format) directly into the position element. - From the Item Database
Select an existing standard item from the internal item library.
It already contains numerous predefined items in various categories.
You can also add your own items and assign individual calculation rules to them.
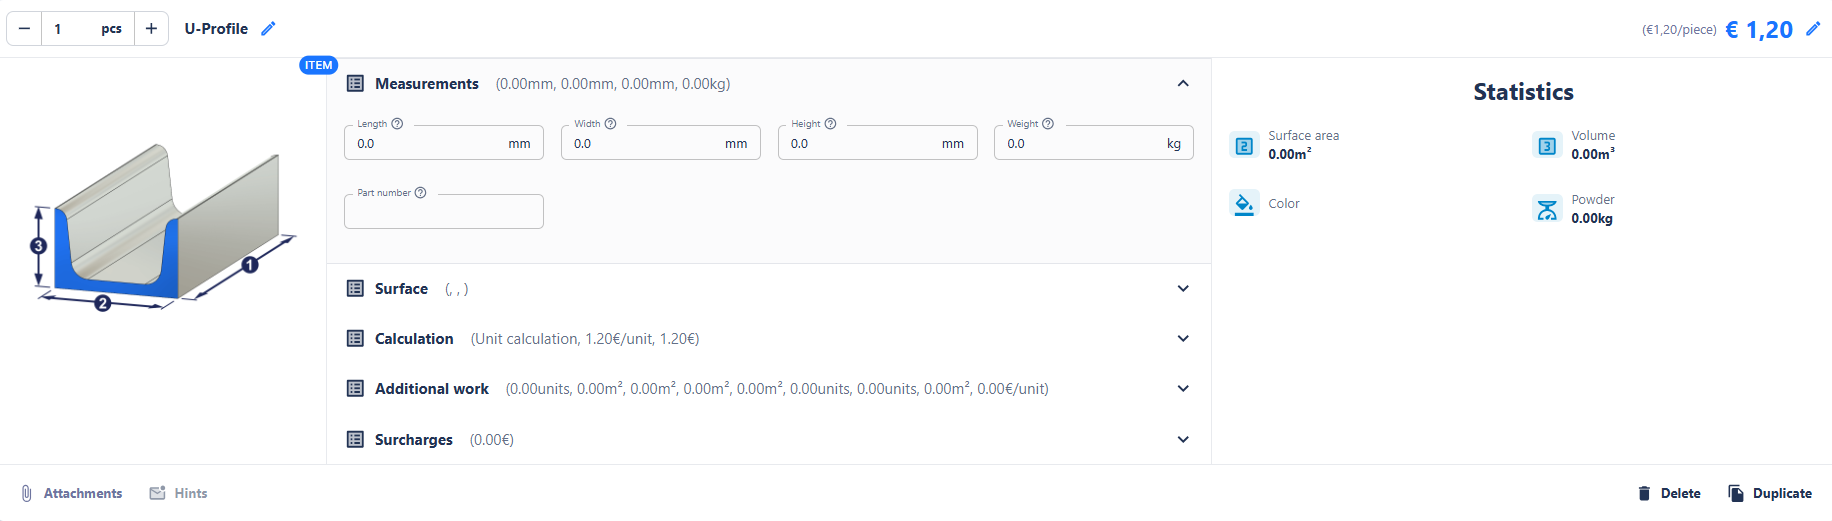
Structure of a Position
A position consists of several sections:
-
Top Left: Quantity and position name
-
Top Right: Total price of the position
-
Center: Input fields (e.g., length, width, height, color, weight, item number, surcharges, etc.)
-
Right: Position statistics (e.g., surface area, volume, color, powder quantity)
-
Bottom Left: Notes (messages definable via the calculation definition)
-
Bottom Right: Buttons to duplicate or delete the position
Using the pencil icon, all values can be adjusted manually.
This also applies to automatically calculated values—the user always has the option to override results individually.
Notes
In the Notes section, rules or informational messages can be stored, which appear automatically when certain conditions are met.
Example:
"Warning: The item exceeds the maximum size of the coating system."
This function is designed to alert users to potential limitations or special considerations in the calculation.
Editing Functions
-
Duplicate: Creates an identical copy of the position, which can then be adjusted.
-
Delete: Completely removes the position from the calculation.
Calculation Definition
The Calculation Definition in Surface Solutions is the central tool for designing the calculation logic for all calculations in your company. It allows you to create individual calculation models, define fields and formulas, and set up notes that are displayed in the Calculation Editor. With the Calculation Definition, you can ensure that all calculations are performed consistently, transparently, and flexibly.
Access to the Calculation Definition
You can access the Calculation Definition via the menu item "Tools & Settings" → "Calculation Definition".
After opening it, you will see an overview of all existing packages. A package contains the complete calculation logic applicable to specific items or calculation scenarios.
Packages are valid across the entire organization, meaning all users within your organization access the same packages. This ensures that calculations are performed consistently, regardless of which user creates or edits the calculation.
Packages
A package forms the basis for a calculation and contains all the information necessary for the computation: templates, fields, formulas, and notes.
Packages can be either standard packages, which are already provided by Surface Solutions, or custom packages. Custom packages are suitable for capturing the specific requirements of your company.
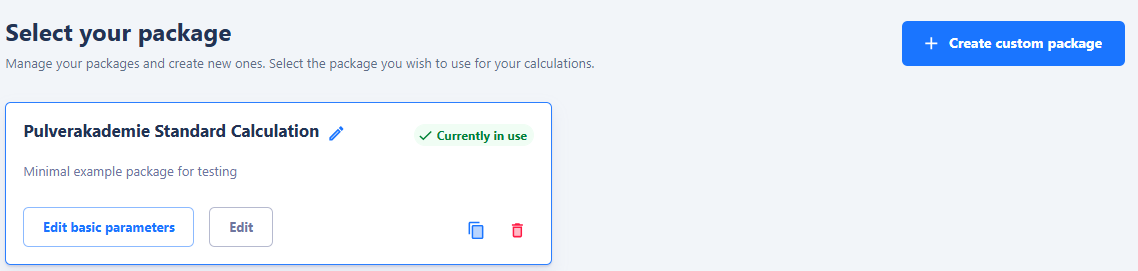
Adjust Basic Data
For each package, you have the option to quickly edit predefined values using the "Adjust Basic Data" button. This includes, for example:
-
Base price per unit
-
Price per square meter
-
Price per kilogram
This function allows you to make simple adjustments without interfering with the formulas of the fields. It is particularly suitable for users who want to update values without changing the complex calculation logic in detail.
Our recommendation: Edit the packages provided by us first using the Adjust Basic Data function before making more complex changes.

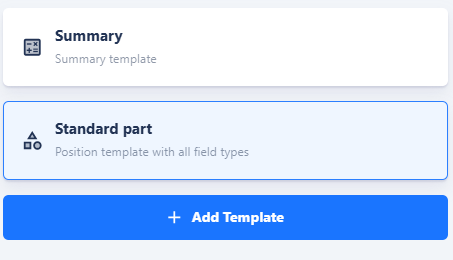
Templates
Within a package, calculations are organized using templates. Each template is a collection of fields and formulas for a specific calculation type, for example:
-
Standard item
-
Small part
-
Special coating
A template defines which fields are queried, how they are calculated, and which notes are displayed.
Item Assignment
Each item is assigned to exactly one template. The standard position is assigned automatically, while other templates must be assigned manually using the "Link Items to Templates" button. This ensures that each item uses the appropriate template for its calculation, while multiple items can share the same template.

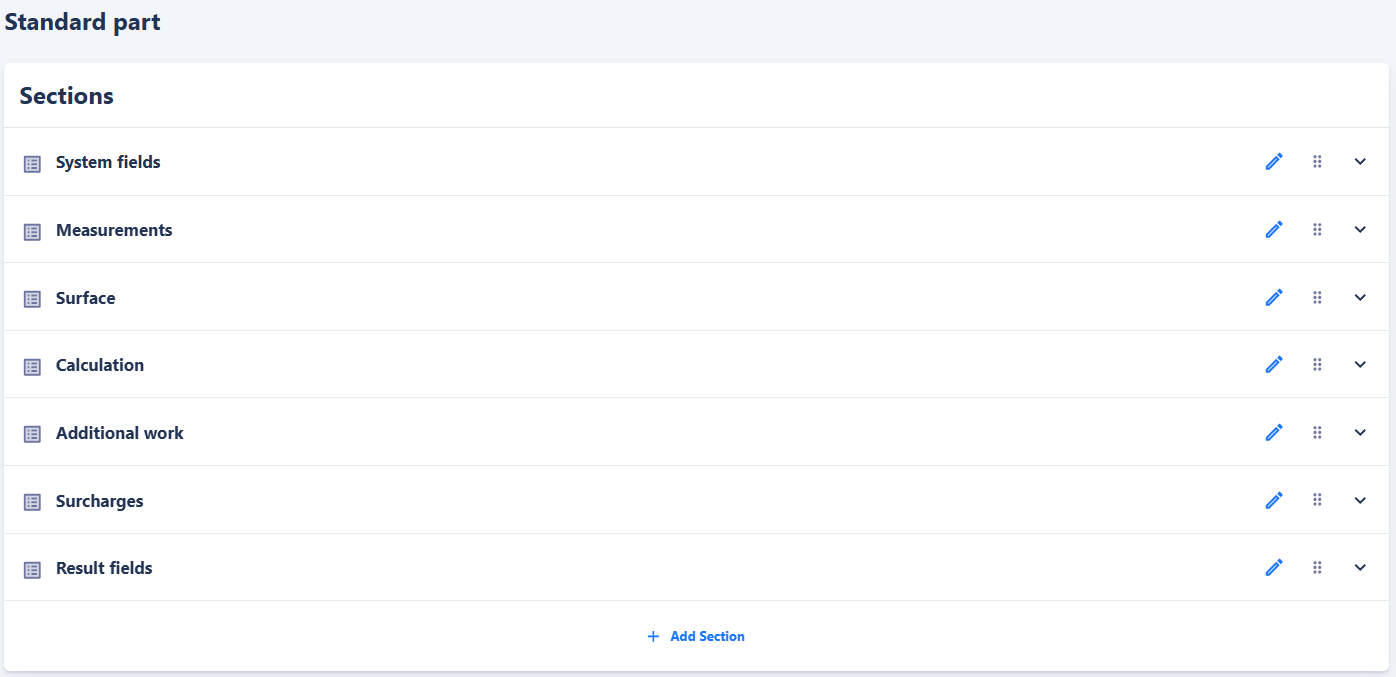
Sections Within Templates
Templates can be divided into sections to group fields thematically. Sections help keep the calculation logic organized. You can add, move, and rename sections. Fields can also be moved between sections, for example, to group surcharge fields or additional costs in a separate section.
This structure makes it easier to organize complex templates and ensures that users see information clearly structured in the Calculation Editor.
Standard Item Template
The Standard Item Template is the central template for individual items. It contains the fields and calculation logic needed for most items in the calculation, such as length, width, height, color, or material costs. Each position in the calculation is initially represented using this template, ensuring that calculations for each item are performed consistently.
Summary Template
The Summary Template is a special template that consolidates all items in a calculation. It is not a template for individual positions but summarizes the overall results of the calculation. Its fields can be found in the Calculation Editor under "Surcharge Fields."
An example of a field in the Summary Template is "SUM_POSITION_PRICE", which automatically calculates and inserts the sum of all positions in the calculation. You can then apply surcharges to this value.
Fields
Fields are the fundamental building blocks of a template. They can serve as input fields for the user or contain calculations.
System Fields
Some fields, such as QUANTITY and PRICE, are required by the system. These fields cannot be deleted but can be optionally hidden. System fields are used to capture inputs or calculate results necessary for the calculation.
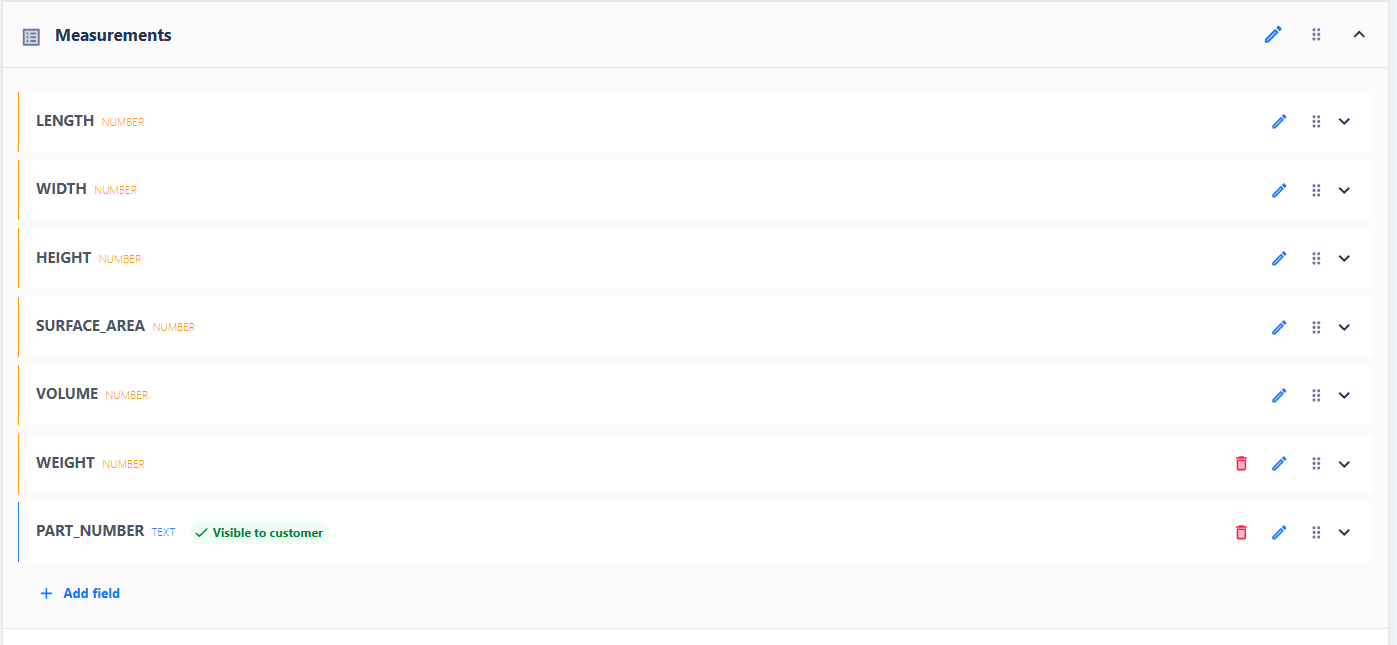
Field Types
You can create fields in various types:
-
Numeric: Numerical values such as length, width, or weight
-
Text: Free text information
-
Checkbox: Yes/No query
-
Dropdown: Selection from a list of predefined values

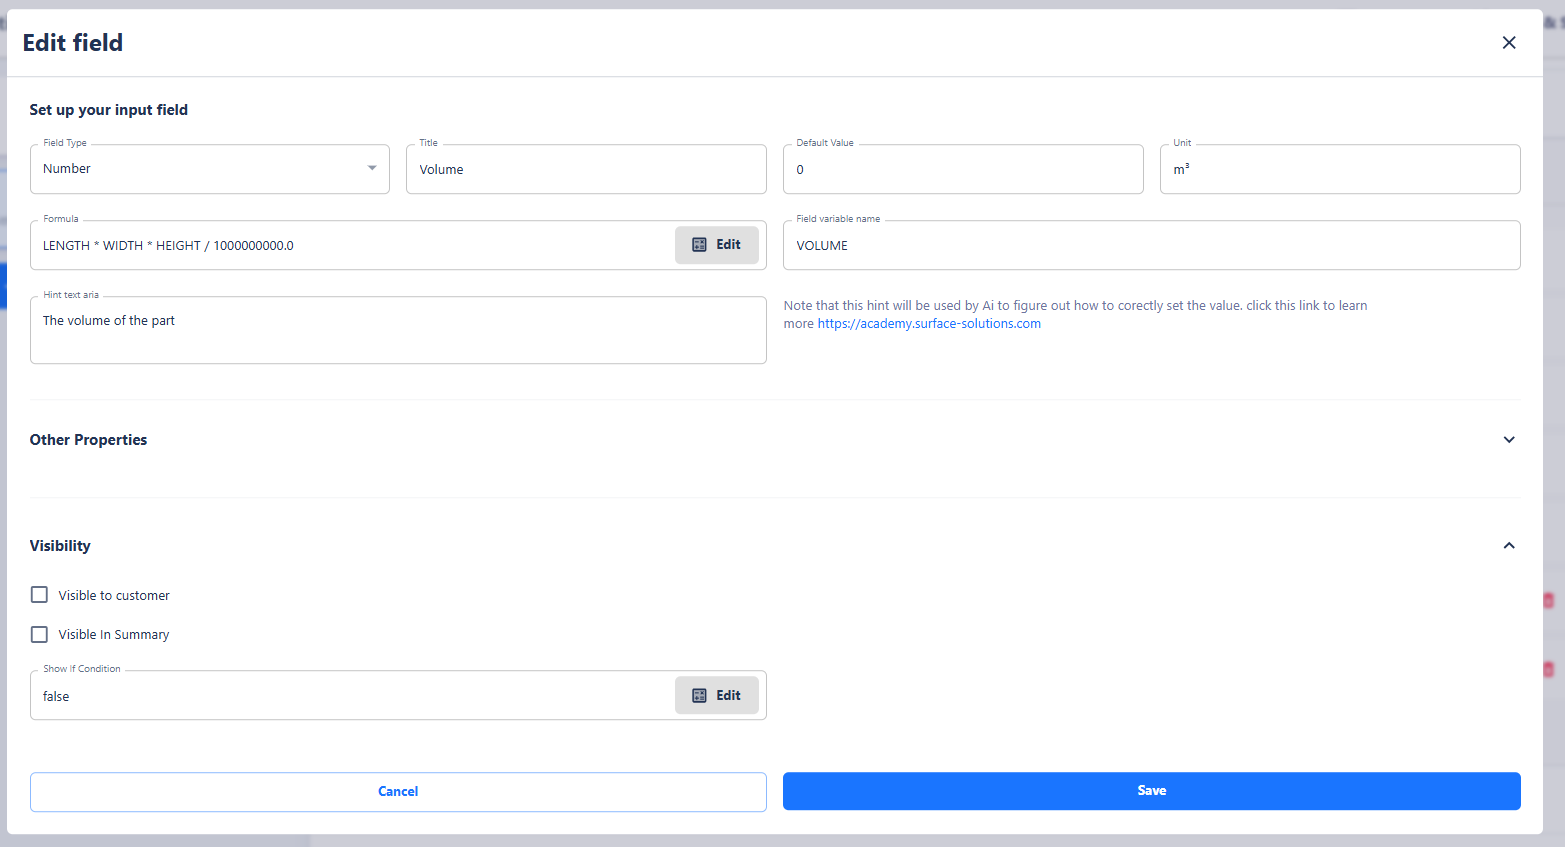
Editing Fields
You can edit a field using the pencil icon. The following properties can be defined:
-
Title and default value
-
Unit (e.g., kg, €, €/m²)
-
Formula, if the field should be calculated
-
Visibility, for example, is visible to the customer in the offer or PDF export
-
Visibility condition, which uses formulas to control whether a field is displayed
Fields without a formula serve exclusively as input fields for the user.
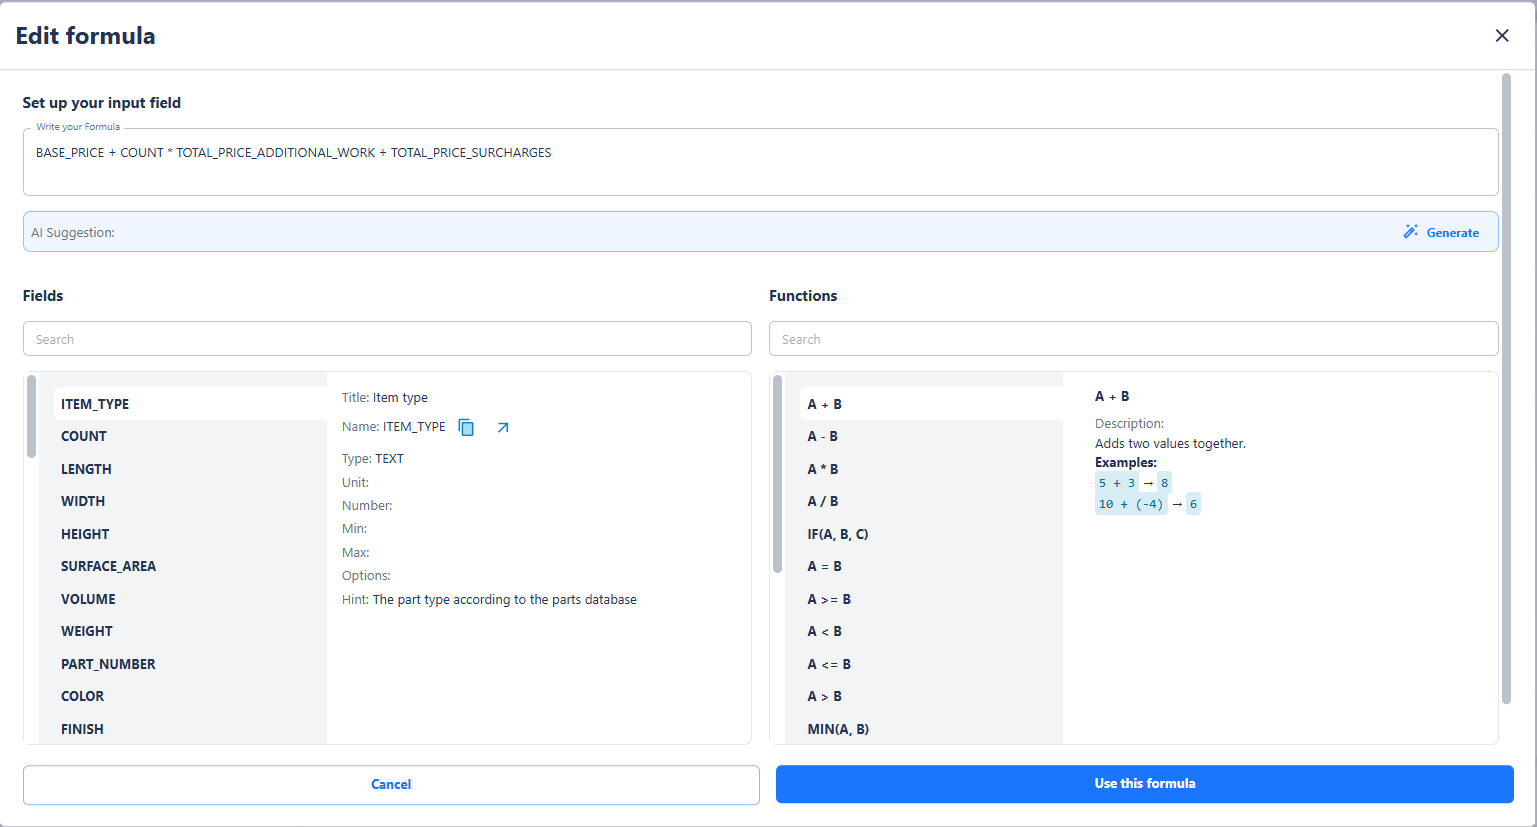
Formulas
Formulas allow calculations to be performed dynamically. They are defined similarly to spreadsheet programs and can include operators and functions, such as:
-
Basic arithmetic: Addition (+), Subtraction (–), Multiplication (*), Division (/)
-
Conditions: If-Then
-
Comparison operators: >, <, =
-
Logical operators: and, or, not
Formulas reference other fields within the same template, enabling complex calculations such as price determination, material requirements, or surface area calculations.
Examples of formulas include:
IF(QUANTITY > 100; 0.9; 1.0)
LENGTH * WIDTH * HEIGHT
QUANTITY * UNIT_PRICE
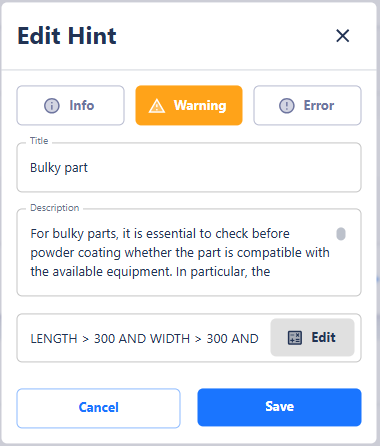
Notes
Notes are used to alert users to specific conditions or special considerations.
- Notes can be of the type Information, Warning, or Error.
- They appear at the bottom left of the position in the Calculation Editor.
- Their display can be controlled using formulas, so that notes are only visible under certain conditions.
Example: A note could appear when the quantity of an item exceeds a defined value.
Test Function
The test function allows you to simulate a template. All fields, including hidden ones, are displayed so you can check whether the formulas work correctly and if the results meet your expectations. The simulation does not save any data; it is solely for reviewing and validating the calculation logic.
Summary
The Calculation Definition is a powerful tool that gives you full control over your calculation logic.
-
Packages bundle all templates and provide organization-wide calculation logic.
-
Templates define the structure and calculations for individual items or calculation types.
-
Fields capture inputs and calculations, allowing complex computations through formulas.
-
Notes inform users about specific conditions.
-
The Test Function offers a safe way to review templates before using them in practice.
With this structure, you can work flexibly and transparently, handle complex calculation scenarios, and ensure both user-friendliness and consistency in your calculations.
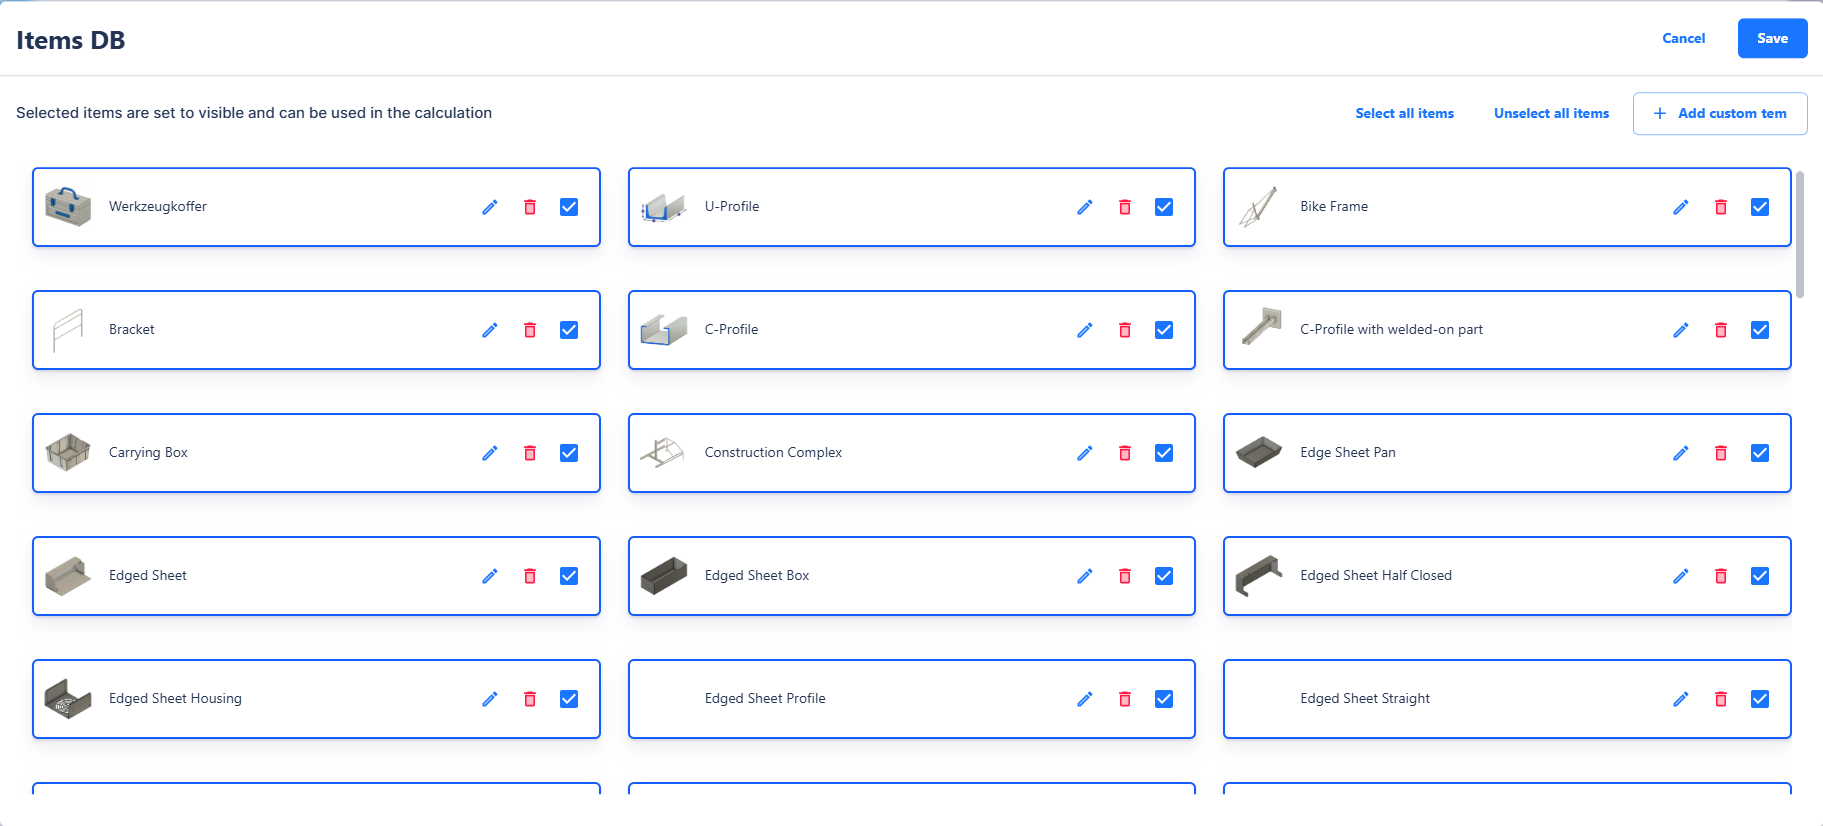
Item Database
The Item Database in Surface Solutions is a central tool for managing all items in your company. It is independent of packages and available to all users within the organization.
The database contains both pre-made standard items and custom items created by you. Each item can be individually customized, including its name, article number, image, and visibility. Using the visibility checkbox, items can be hidden if needed, so they do not appear in the Calculation Editor.
Creating and Editing Items
New items can be created directly through the Item Database. You assign:
-
Item Name
-
Article Number for unique identification
-
Image for easier recognition
Existing items can be edited or deleted at any time. Changes automatically affect all calculations in which the item is used.
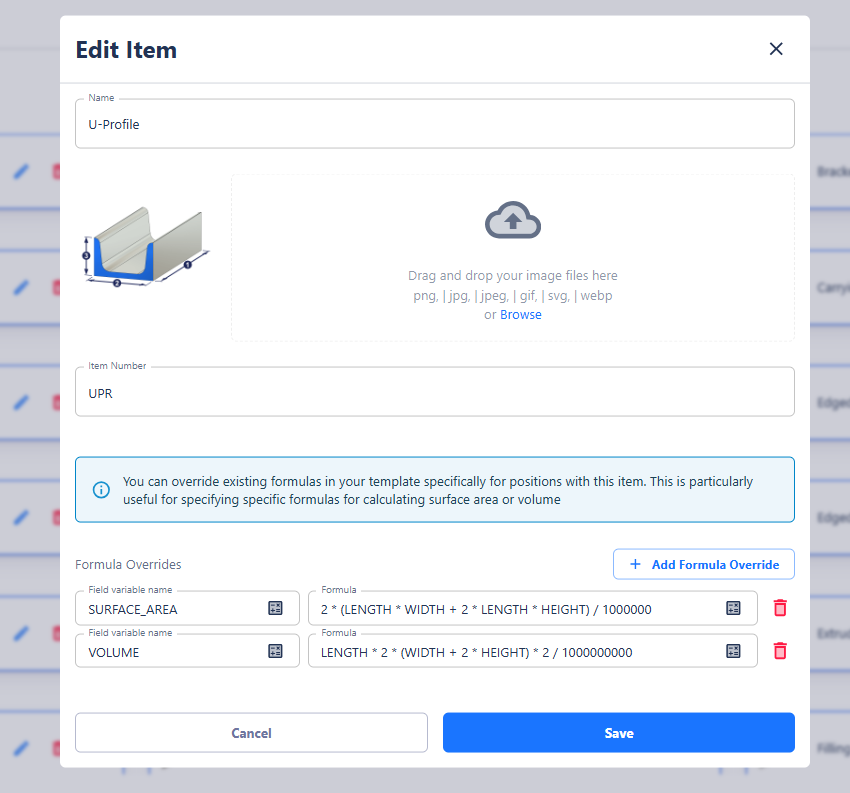
Formula Overrides
A key feature of the Item Database is formula overrides for individual items.
If a template in the Calculation Definition contains a field, e.g., volume, the standard formula may not be suitable for certain items due to differing geometries. Examples:
-
A U-profile has a different surface area than an L-profile or a sheet metal box.
-
A rim requires its own volume and surface area calculation.
In such cases, you can assign a custom formula override for each item. The following rules apply:
-
The variable name must match exactly with the variable name in the template for the override to be applied.
-
Multiple overrides per item are possible, e.g., volume, surface area, weight, etc.
-
If a formula is incorrect, for example, because required values are missing, the standard template formula is automatically used again.
Formula overrides affect only the calculation. Users do not see additional fields in the Calculation Editor—the values are simply calculated based on the item-specific formulas.
Integration into the Calculation Editor
Once an item is assigned to a position, the formula override is applied automatically if it exists. Otherwise, the standard formula from the template is used. This allows you to perform individual calculations for different items without having to adjust the template for all positions.
This ensures that complex item geometries are calculated accurately, while the calculation logic remains consistent and transparent.
Summary
The Item Database allows you to:
-
Manage all items of your organization, independent of packages
-
Create, edit, and delete items
-
Define visibility in the Calculation Editor
-
Set formula overrides for specific items
-
Perform individual calculations for different geometries, e.g., volume, surface area, or weight
-
Automatically apply item formulas in the Calculation Editor, with fallback to standard formulas in case of errors
With the Item Database, you can fine-tune the calculation logic at the item level while ensuring that your calculations remain reliable and transparent.
Offer
Overview
Offers in Surface Solutions form the central link between calculations and orders. They allow you to generate a professional offer for your customers based on a completed calculation—comprehensive, transparent, and in your corporate design.
An offer summarizes the results of a calculation and adds customer-relevant information such as payment and delivery terms, tax rates, and legal notices.
All content is automatically compiled from three sources: customer data, calculation, and document definition. This creates a complete, correctly formatted offer with minimal effort.
With offers, you can:
-
Create offers directly from existing calculations
-
Automatically adopt customer and standard information
-
Adjust positions individually and apply discounts
-
Export offers as PDF or send them via email
-
Create follow-up offers or generate orders directly from won offers
The offer management in Surface Solutions is divided into several areas:
- Create Offers
Describes the process of generating an offer from a calculation.
All relevant data is automatically adopted, standard positions are added, and the offer can be reviewed using the preview function before being finalized. - Offer Overview
Displays all created offers in a table format.
Here, you can filter, search, export, or send offers via email.
If the status of an offer is set to "Won", an order can be generated directly from it. - Create Follow-Up Offers
Allows you to create a new follow-up offer from an existing offer—ideal for minor adjustments or price changes.
The new offer receives a version number (e.g., V2, V3, V4) to keep the development traceable.
Creating Offers
In Surface Solutions, offers can be created directly from a calculation. The prerequisite is that the calculation includes a customer. The customer provides the necessary information, such as address and contact person, which is automatically adopted into the offer.
Offer Editor
Once a customer is entered in the calculation, the "Create Offer" button appears in the top right area of the Calculation Overview. Clicking it takes you to the Offer Editor, where all data from three sources is consolidated:
- Customer Data: address, contact person, and other relevant information
- Calculation: positions, total price, and any additional information
- Document Definition: standard texts, footnotes, payment terms, delivery terms, and standard positions
Positions in the Offer Editor
All positions from the calculation are automatically adopted into the offer. Additionally, standard positions from the document definition are added if configured. These can be deleted if needed.
In the Offer Editor, you can:
-
Edit or delete positions
-
Adjust prices for individual positions
-
Apply discounts to individual positions or the total sum
-
Change the order of positions
Preview and Creation
Clicking the "Create Offer" button generates the offer permanently and stores it in the Offer Overview. After creation, an offer can no longer be edited. If changes are needed, a follow-up offer can be created (see chapter "Create Follow-Up Offer").
Numbering
Each offer receives a sequential offer number. The numbering sequence can be defined organization-wide through the document definition, similar to invoices or credit notes.
Offer Overview
The Offer Overview in Surface Solutions provides central management of all created offers. It allows you to quickly review the status, details, and next steps for each offer.
You can access the Offer Overview via the "Offers" item in your navigation bar.

Overview and Filters
In the overview table, you can see the following information for each offer:
-
Offer number
-
Creation date
-
Customer
-
Creator
-
Status
-
Net and gross amount
You can filter offers by status and customer or use the free-text search to find specific offers. Filtering is dynamic, and the overview is updated accordingly.
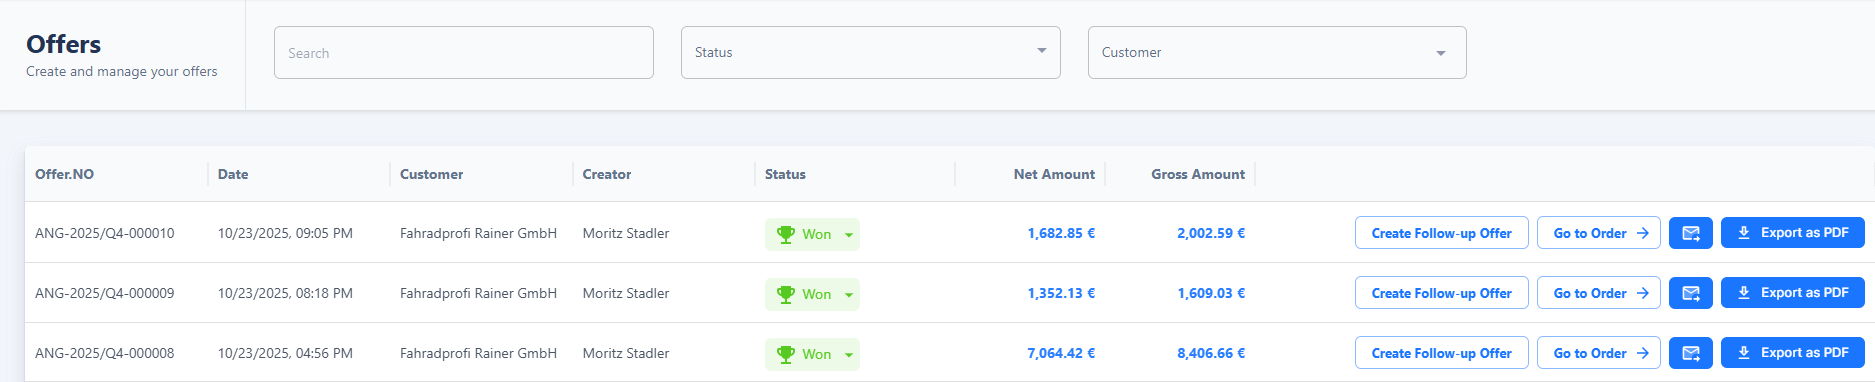
Actions for Offers
The following actions are available for each offer:
-
Create Follow-Up Offer: The offer is copied, allowing minor adjustments without creating a new calculation. For more complex changes, duplicating the calculation is recommended.
-
Send Offer via Email or Export as PDF: Data is automatically adopted from the customer database, the calculation, and the document definition.
Status "Won" and Order Creation
The status field is particularly important:
When you set the status of an offer to Won, the "Generate Order" button appears automatically. Clicking this button creates an order based on the offer, adopting all positions, prices, and information.

Create Follow-Up Offers
A follow-up offer is used to make small changes based on an existing offer, without recalculating the underlying calculation. This function is particularly helpful when you want to adjust prices or quantities, or modify individual items, without having to repeat the entire offer creation process.
Creation of a follow-up offer
In the offer overview, you will find the button “Create follow-up offer” for each existing offer.
After clicking on it, the offer editor opens and automatically takes over all data from the original offer:
-
Customer information
-
Positions and prices
-
Texts and notes from the document definition
![]()
In the editor, you can edit all relevant values — such as prices, quantities, or texts. However, the calculation logic remains unchanged. Therefore, it is not possible to modify calculations or templates within the follow-up offer.
The new follow-up offer automatically receives the same offer number as the original, supplemented by a sequential version number, e.g. V2, V3, or V4. This ensures that the development of an offer remains traceable at all times.
If major changes are required — for example, adjustments to positions that require a recalculation — it is recommended to duplicate the calculation and create a completely new offer based on it. This ensures that both the original data and the calculation logic remain consistent and traceable.
Order
Overview
Orders in Surface Solutions serve as the central management layer for all order processes. They allow you to generate orders from won offers, manage positions, monitor order status and progress, and directly create invoices or credit notes.
With orders, you can:
- Create and manage orders from won offers
- Edit, duplicate, delete, or add new positions
- View material requirements and order notes centrally
- Track and monitor the status of each order
- Create invoices when the outstanding amount is positive
- Create credit notes when the outstanding amount is negative
Orders are modular in structure and consist of several sections:
- Order Overview:
Displays all orders in a clear layout. Here, you can view information such as status, timeline, total order value, invoiced orders, and open orders. From this view, you can navigate directly to the related offers or invoices. - Order Editor:
Allows detailed editing of individual orders. You can add, edit, delete, or duplicate positions, apply discounts, manage attachments, add notes, and view material requirements. Outstanding amounts are displayed and used directly for creating invoices or credit notes.
Create Order
Orders allow you to represent won offers. They enable you to track costs and create invoices or credit notes.
An order can only be created from a won offer. To create an order, first set the status of an offer to Won. After doing so, the Generate Order button appears in the offer overview.
Clicking this button takes you directly to the Order Editor, where you can manage the new order.

When creating an order, all positions are automatically transferred from the won offer. This ensures that the calculation and the positions defined in the offer are correctly carried over into the order.
Invoices can later be generated from an order. All details about editing options within the order—such as adjusting quantities, prices, positions, or performing other operational steps—can be found in the Order Editor chapter.
Through the automatic transfer of offer positions and the direct connection to invoices, the system ensures consistent and traceable billing.
Order Overview
The order overview provides a structured display of all orders in your system and functions similarly to the calculation overview.
Each order is presented as a card, offering a quick summary of the most important information.
You can access the order overview by clicking “Orders” in your navigation bar.

On the cards, you will find:
-
Order Status: Indicates the current progress of the order
-
Timeline: Shows the planned completion target
-
Total Order Value: The sum of all positions within the order
-
Invoiced Amount: Positions that have already been billed
-
Open Amount: Positions that have not yet been invoiced
Additionally, you can access further information directly from the overview:
- Show Related Offers: Lists all offers associated with this order

- Show Related Invoices: Displays all invoices, credit notes, and cancellation invoices associated with this order


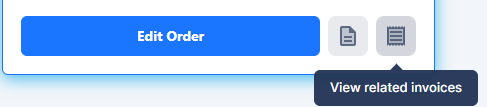
The order overview thus provides quick orientation and simplifies the management of orders, especially for larger projects with many positions or multiple associated documents.
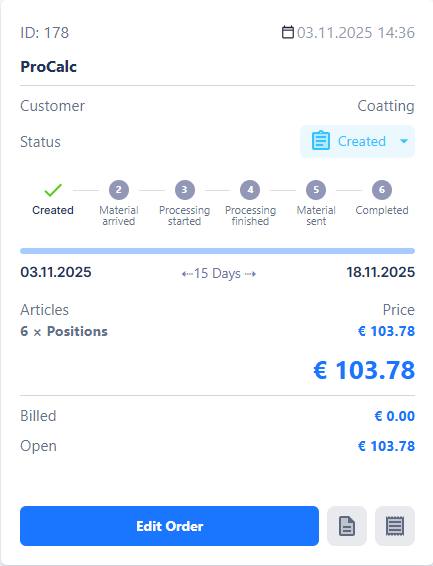
Order Editor
The Order Editor is the central page for managing an individual order. It opens when you click on an order in the order overview. On this page, all relevant information about the order is displayed and can be edited.
At the top of the editor, you can see the customer, the total net order value, the positions already invoiced, and the open amount — which represents the difference between the total order value and the amounts already billed. You can also navigate directly to the associated offer or add attachments to the order — either for individual positions or for the entire order. Material requirements and notes can likewise be managed directly within the order.

The main section contains the order positions. These positions are imported from the offer by default, but can be supplemented if additional costs arise or extra discounts are to be granted. Each position can be edited or deleted as long as it has not yet been marked as invoiced. Once a position has been invoiced, its status changes from “not invoiced” to “invoiced,” and it can no longer be edited.

For each position, the following information is displayed: quantity, name, unit price, discount, total price, item number, description, and attachments. Positions can be duplicated to quickly create similar items.
At the top right, the outstanding amount is displayed. From an order, both invoices and credit notes can be created:
-
Invoices can be created when the outstanding amount is positive.
-
Credit notes can be created when the outstanding amount is negative.
A negative outstanding amount can occur if individual positions are edited to have a negative price or if a new position—such as a “discount” item with a negative amount—is added. These adjustments cause the total amount to become negative, making it possible to create a credit note.
Additionally, the order editor displays the status of the order to monitor progress. Various stages are shown here, including: “created,” “material received,” “processing started,” “processing complete,” “material shipped,” and “completed.”
Delivery Notes
Delivery notes in Surface Solutions are used for documenting and tracking deliveries within an order. They are created directly in the Order Editor of an existing order, so that all relevant information about the order and its items is automatically included.
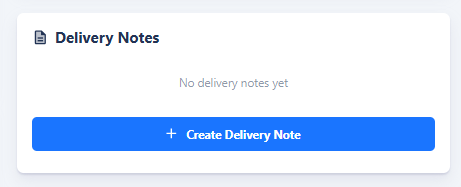
To create a delivery note, click the Create Delivery Note button in the Order Editor. This opens the Delivery Note Editor, where you can review and edit the desired information. Once completed, a PDF can be generated, which can be used for both internal purposes and customer shipments.
Created delivery notes are displayed in the Order Editor under the Delivery Notes section. This allows you to always keep track of already created delivery notes and see which items have already been delivered.
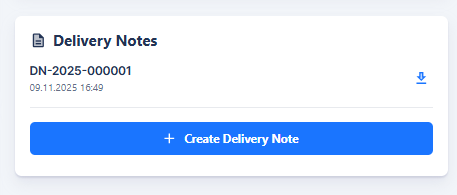
The creation of delivery notes is thus closely integrated into the order workflow and ensures that deliveries are documented, traceable, and transparent for all parties involved.
Invoice
Overview
With Surface Solutions, you can make your invoicing efficient, transparent, and traceable. It allows you to manage invoices, credit notes, and cancellation invoices in a structured way, issue partial invoices, automatically calculate totals, and handle export and dispatch directly from the platform.
With invoices, you can:
-
Create, edit, and manage invoices for orders
-
Issue partial invoices or adjust individual line items
-
Generate credit notes when the open amount of an order is negative
-
Automatically create cancellation invoices to correctly reverse already issued invoices
-
Export invoices and credit notes as PDFs or send them by email
The invoice management system is modular and consists of several areas:
-
Invoice Editor:
Here, you create new invoices or credit notes from existing orders. All relevant information is pre-filled automatically, including customer data, line items, tax rates, and document templates. You can edit items, apply discounts, issue partial invoices, and check previews before the invoice is finally generated. -
Invoice Overview:
Provides a central view of all invoices, credit notes, and cancellation invoices. You can filter by customer or status, access individual invoices, export them, or send them by email. From this overview, you can also access the functions for cancellation and credit note creation. -
Cancel Invoices:
Enables the cancellation of already created invoices. A legally correct cancellation invoice is automatically generated to offset the original invoice. The status of the original invoice is set to "canceled," while the new cancellation invoice follows the same numbering sequence. -
Create Credit Notes:
Allows you to create credit notes for orders with a negative open amount. The editor corresponds to the invoice editor, enabling adjustment of items, totals, and tax rates, generating an independent credit note with its own numbering sequence. -
Export Invoices:
Enables batch export of multiple invoices within a defined date range. The selected invoices are compiled as PDF files in a ZIP archive for efficient archiving or further processing.
The invoice management in Surface Solutions thus provides a comprehensive solution covering all relevant steps from creation, editing, cancellation, and credit note generation to export. This ensures full control over open amounts, invoiced positions, and all invoice documents, regardless of the complexity of your orders.
Create Invoice
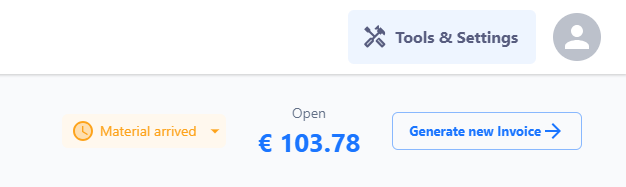
Invoices in Surface Solutions are created exclusively based on existing orders. This means that an invoice can only be generated if an order has a positive outstanding amount. If the outstanding amount is greater than 0, an invoice can be created. If the outstanding amount is less than 0, a credit note can be created instead (see the Credit Notes chapter).
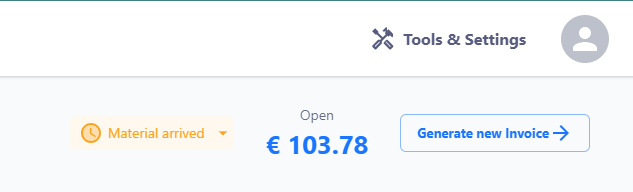
Access and Creation
To create a new invoice, first open the desired order.
In the upper section of the order editor — in the header — you’ll find the button “Generate New Invoice”.
After clicking this button, the invoice editor will open.
The invoice editor displays all the information that will appear on the invoice. This data comes from three sources:
- From the order – in particular, the items, amounts, and reference values.
- From the customer data – such as name, address, contact person, and tax number.
- From the document definition – including predefined standard texts, tax rates, payment terms, and legal notices.
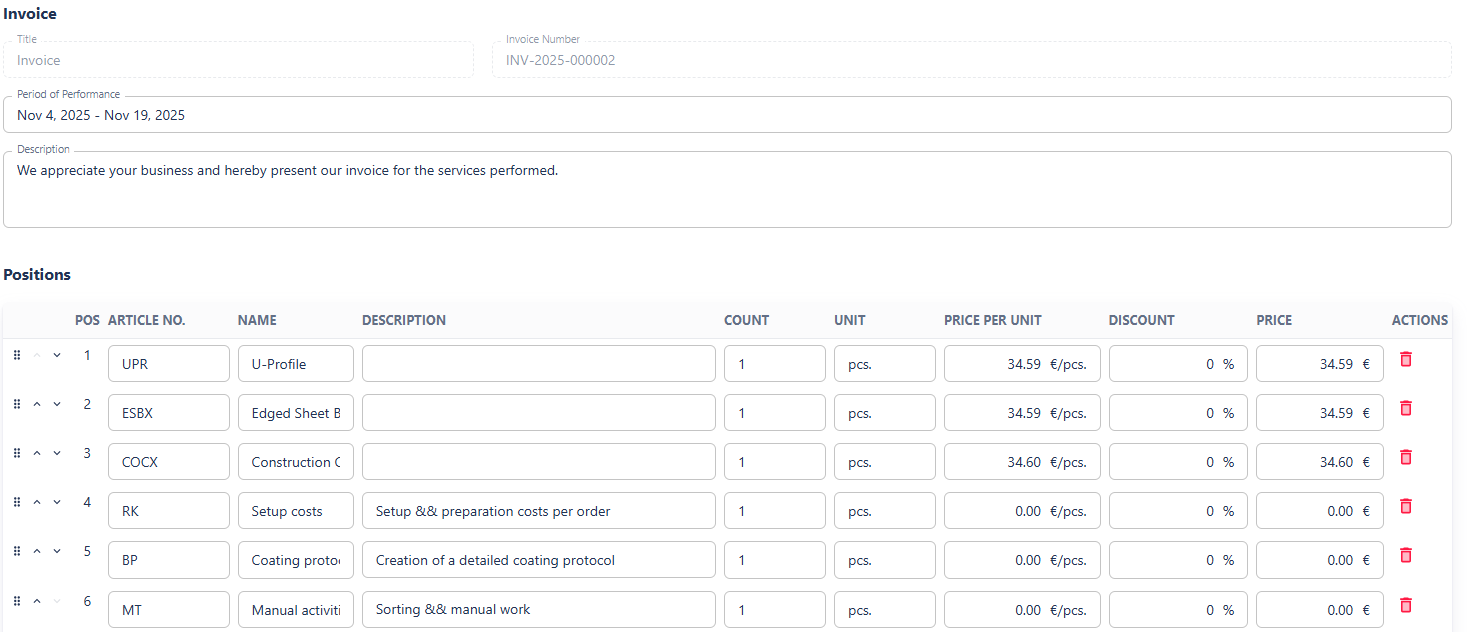
Editing Options in the Invoice Editor
In the invoice editor, you can adjust various details before generating the invoice:
- Sender information: Select or modify your own address details.
- Customer Information: View the customer’s address and, optionally, add a separate delivery address.
- Service period and description: Free-text fields for a more precise description of the billed services.
- Positions:
-
Positions from the order are imported automatically.
-
Individual positions can be edited (quantity, unit price, discount, total price).
-
The order of positions can be changed.
-
Positions can be deleted if they should not appear on the invoice.
- Important: Deleting a position in the invoice editor does not remove it from the order. It simply won’t be printed on the invoice and won’t be marked as invoiced.
-
After the invoice is created, all positions included in it are automatically marked as invoiced in the order.
When creating a new invoice, only positions that have not yet been invoiced are suggested.
Totals and Taxes
Below the list of positions, you will find the total overview. Here, you can:
-
Apply a discount to the total amount,
-
Select the tax rate (a single overall tax rate per invoice),
-
And — if enabled — display a SEPA QR code on the invoice to facilitate payment by bank transfer.
The available tax rates come from the document definition and can be maintained centrally there.
Surface Solutions attempts to automatically select the appropriate tax rate based on your country and that of your customer. However, you can override this selection manually at any time.
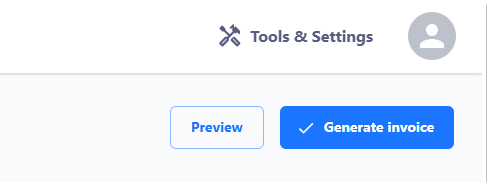
Preview and Generation
Once all information has been checked and is complete, two actions are available:
- Show Preview
Displays a temporary PDF preview of the invoice. This is for review purposes only and is clearly marked “Preview.” No document is saved or finalized during this step. - Generate Invoice
This action creates the invoice permanently.
Before generation, a preview is shown for final verification.
After confirmation, the invoice is assigned a sequential invoice number and saved in the invoice overview.
Note: Once generated, an invoice can no longer be edited or deleted.
If a correction is necessary, the invoice can be adjusted using the “Cancel” option or by creating a credit note (see the respective chapters).
Invoice Number and Filing
The invoice number is automatically assigned upon generation.
The number format can be configured via the document definition — for example, sequential numbers, years, or combinations thereof.
The completed invoice is automatically stored in the invoice overview. From there, it can be:
-
Downloaded as a PDF, or
-
Sent directly to the customer via email.
Invoice Overview
The invoice overview provides a central view of all invoices created in the system. From here, invoices can be viewed, exported, sent by email, or opened directly in the associated order.
You can access the invoice overview via the “Invoices” section in the navigation bar or through the quick access menu.

After an invoice is generated, it is automatically listed in the invoice overview. Each invoice is displayed as a separate row and shows the most important information at a glance.
Displayed Information
The overview displays the following information for each invoice:
-
Invoice Number – Automatically assigned according to the defined numbering logic.
-
Date – The date and time the invoice was created.
-
Customer – Name of the customer for whom the invoice was issued.
-
Creator – User who generated the invoice.
-
Status – Current status of the invoice (e.g., open, paid, canceled, etc.).
-
Type – Type of document, e.g., invoice, time-based invoice, or credit note.
-
Amounts – Displays net and gross amounts.
This overview allows the invoice progress to be efficiently tracked across the entire organization.

Filter Functions
Using the filter bar above the table, invoices can be filtered by status and customer. Both filters can be combined to display specific subsets, for example, all open invoices for a particular customer.
Filtering is applied directly on the page, so results are updated immediately. The filter settings are reset when leaving the page.
Batch Export
The Batch Export function is available in the invoice overview. It allows invoices within a specific time period to be exported simultaneously as a ZIP file. The ZIP file contains a separate PDF document for each invoice.
This function is particularly useful for accounting purposes or regular archiving.
Actions per Invoice
For each invoice, several actions are available in the overview:
-
Go to Order – Opens the corresponding order from which the invoice was created.
-
Send via Email – Opens your local email client, allowing you to send the invoice.
-
Export PDF – Allows downloading the invoice as a PDF file.
Cancellations
When the status of an invoice is set to “canceled,” the system automatically creates a credit note.
Before creation, a confirmation dialog appears asking the user to confirm the cancellation.
After confirmation, the credit note is automatically generated and displayed in the overview as a separate invoice with the corresponding note. More details on canceling an invoice can be found on the Canceling Invoices page.
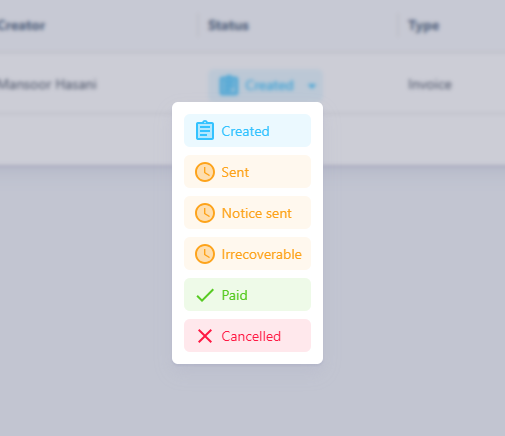
Canceling Invoices
Invoices can be canceled directly from the invoice overview or in the invoice editor.
To cancel an invoice, select “canceled” in the Status field. A confirmation dialog will then appear, where you must confirm the action. The cancellation is only executed after this confirmation.
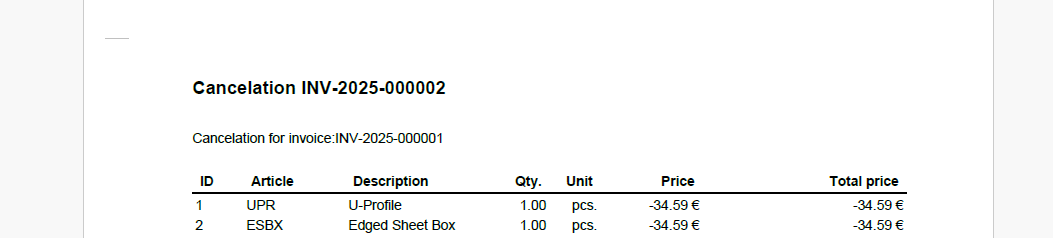
Cancellation Process
After confirmation, the selected invoice is marked as canceled. No further changes are made to the original invoice; it remains fully stored in the system. However, a new document is automatically created—the so-called cancellation invoice.
This cancellation invoice is assigned a consecutive invoice number within the same numbering sequence as regular invoices. It contains all items from the original invoice, but with negative amounts so that the total cancels out the previously billed amount. The generated PDF also automatically includes the note: "Cancellation Invoice for Invoice: [Original Invoice Number]".

Properties of the Cancellation Invoice
- The cancellation invoice is an independent document with the type “Cancellation Invoice”.
- It is displayed in the invoice overview as a new, current invoice.
- Content-wise, it corresponds to the original invoice but with negative totals.
- Email sending and export function the same way as with any other invoice.
- A canceled invoice cannot be reactivated or modified.
While cancellation invoices are issued within the same numbering sequence as regular invoices, credit notes have their own separate numbering sequence. This ensures that both types of documents remain clearly traceable.
Create Credit Notes
Credit notes in Surface Solutions are created exclusively from existing orders. A credit note can only be generated if the outstanding amount of an order is negative.
The outstanding amount is automatically calculated:
It results from the sum of all order items minus the amounts already invoiced. Once the outstanding amount is less than 0, the "Create Credit Note" button appears in the order editor instead of the "Create New Invoice" button.
If the amount is exactly 0, no invoicing can occur, and for a positive amount, the "Create Invoice" button is available again. In the order editor, you can add or remove items to adjust the outstanding amount.

Credit Note Editor
By clicking on “Create Credit Note,” the Credit Note Editor opens, which in structure and functionality is identical to the Invoice Editor.
The credit note initially includes all positions from the order, but can be adjusted within the editor. The following editing options are available:
-
Edit positions: Quantity, price, discount, and order can be modified.
-
Add or delete positions: New positions can be added or removed without affecting the underlying order.
-
Totals, tax rates, and notes: The credit note total, tax rate, and any notes are automatically calculated or taken from the document definition.
-
Preview: The “Preview” button allows a temporary PDF preview of the credit note.
All text blocks, tax rates, and standard notes are derived from the document definition, which is centrally maintained per organization. The document title is automatically set to “Credit Note.”
Generation and Numbering
Once the information has been checked and confirmed, the credit note can be finally created using the "Generate Credit Note" button.
After generation:
-
The credit note is automatically linked to the original order,
-
It appears in the invoice overview with the type "Credit Note",
-
It receives its own sequential number from the numbering series for credit notes (independent of invoice numbers).
The numbering series can be configured via the document definition.

Export and Sending
Credit notes can – just like invoices –
-
be exported as PDFs,
-
sent to the customer via email,
-
and accessed through the invoice overview.
They are subject to the same formatting and layout rules as invoices, but differ in the document title.
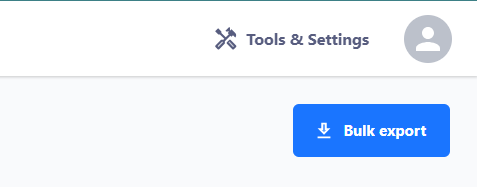
Export Invoices in Bulk
In the Invoice Overview, users have access to the Bulk Export function to export multiple invoices at once.
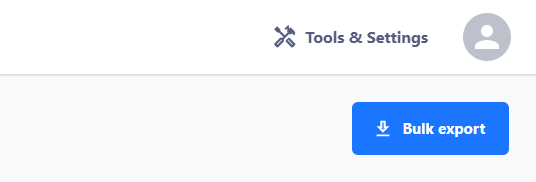
Process
-
Click the "Bulk Export" button in the top right corner.
-
A dialog opens where you can set a date range for the export.
-
After confirming the date range, click "Export".
The export generates a ZIP file containing all invoices within the selected period as individual PDF documents.
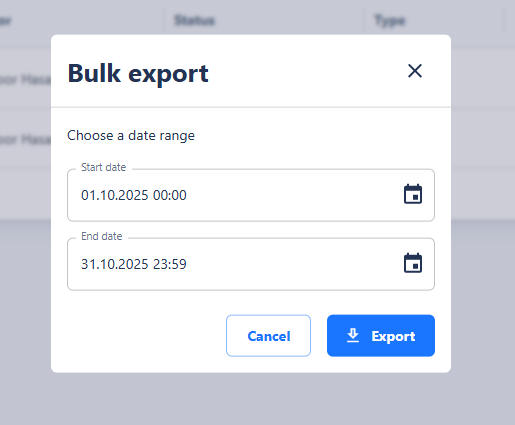
This bulk export provides an easy way to download invoices collectively for accounting, archiving, or internal reporting.
Customer
Overview
The Customer Management feature in Surface Solutions serves as the central hub for maintaining and organizing all customer information.
Here, master data is managed, new customers are created, and existing data is updated or exported.
Customer data forms the foundation for calculations, offers, orders, and invoices — making it a central part of the entire workflow.
With Customer Management, you can:
-
Record and edit customer master data
-
Create new customers directly in a calculation or via the customer overview
-
View and search all customers in a clear list
-
Export, edit, and re-import customer data via CSV files
The Customer Management section is divided into two main areas:
-
Manage Customers
In the customer overview, you can see all existing customers of your company.
Here, you can add new customers, edit or delete existing records.
Each customer record can include key information such as company name, address, VAT ID, contact person, phone number, email address, notes, and preferred contact methods.
New customers can also be created directly within a calculation — Surface Solutions automatically detects when a company name does not yet exist and offers the option to create a new customer record. -
Import and Export Customers
Using the import and export functions, customer data can conveniently be backed up or updated via CSV file.
The export creates a file in system format containing all relevant fields, including the unique customer number.
This file can be modified as needed and then re-imported.
Customers with existing customer numbers are updated, while new records are created automatically.
Importing from other systems is also possible, provided the data is converted into the appropriate CSV format.
Manage Customers
In Surface Solutions, you can centrally manage, edit, and create new customers.
You can access the customer page via Tools and Settings → Customers. There, you will find an overview of all existing customers in your organization.
Customer Overview
The customer overview displays all registered customers in a tabular format. Using the search function, you can quickly find customers and open them with a click to view or edit their data.
With the “Add Customer” button, you can create new customers and enter their master data.
Create a Customer
A new customer can be created either directly through customer management or within a calculation.
If you enter a new name in the Company field during a calculation that does not yet exist in the system, the button “Create New Customer” will automatically appear.
After clicking it, a new customer with the specified name will be created, and you can add additional information directly within the calculation.
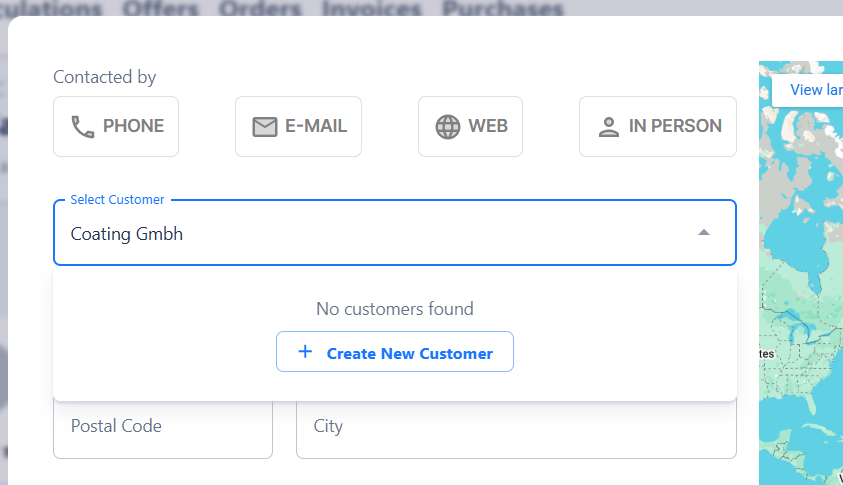
By clicking “+ Create New Customer,” you can create a new customer directly within the calculation.
Customer Data
For each customer, you can record and manage the key master data, including:
-
Company name
-
Address
-
VAT number
-
Contact person
-
Email address
-
Phone number
-
Notes
-
Preferred contact method (e.g., email, phone, web, in-person)
Edit and Delete
Customers can be edited at any time to update or add information.
Customers that are no longer needed can be deleted.
Customers Import and Export
Depending on your version, this function may not yet be activated. Please contact your account manager for more information.
In Surface Solutions, customer data can easily be exported and re-imported using a CSV file.
This allows both the backup of existing customer data and the simple transfer of customers from other systems.
Export Customers
Through customer management, you can export all existing customers as a CSV file.
This file contains all relevant information for each customer, including the customer number, which serves as a unique identifier. The CSV export is especially useful for backing up data or making bulk changes outside the system.
Edit and Reimport Customers
The exported CSV file can be opened and edited in a spreadsheet program.
When making changes, ensure that the customer number remains unchanged — it serves as the link between existing records and the updated information.
After editing, you can upload the file again in the same format.
During import, existing customer data will be updated based on the customer number.
If an entry contains a new customer number that does not yet exist in the system, a new customer with that number will be automatically created.
Import Customers from Other Systems
If you want to import customer data from another system, it must first be converted into the Surface Solutions CSV file format.
Only in this way can the system correctly match the fields.
Customers without a customer number will automatically receive the next available customer number during import, ensuring continuous numbering.
Suppliers & Purchases
Overview
The supplier and purchase management in Surface Solutions serves as a central hub for organizing all supplier information, purchases, and material requirements.
Here, you can create suppliers, manage their articles and batch sizes, create purchases, and monitor material requirements.
The information from supplier management forms the basis for efficient purchase processes and timely fulfillment of all purchases – making it a central part of the overall workflow.
With the supplier and purchase management, you can:
-
Record and edit supplier master data
-
Manage supplier articles and batches
-
Create, edit, generate as a PDF, and send purchases via email
-
View material requirements and receive automatically optimized purchase suggestions
The supplier and purchase management are divided into the main areas:
- Manage Suppliers:
In the supplier overview, you see all suppliers recorded for your company.
Here you can add new suppliers or edit existing records.
For each supplier, central information can be stored, including articles, batch sizes, color system, gloss level, and surface structure.
Articles can be marked as preferred so that they are prioritized in purchase suggestions, even if the price is higher. - Create Purchases:
Use the "Create Purchase" button to start the purchase process.
First, select the desired supplier, then the articles and batches to be purchased.
In the purchase editor, you can finalize the purchase, generate it as a PDF, and send it directly via email to the supplier. - Material Requirements:
The requirements list shows the current material needs from all purchases.
On the left, you see the required materials and their quantities; on the right, the system automatically displays the matching purchase suggestions.
The system considers the optimal suppliers, batch sizes, and quantities to minimize costs and avoid shortages.
Low stock is also highlighted, allowing you to respond in a timely manner.
Manage Suppliers
Under Manage Suppliers, you will find an overview of all suppliers registered in the system. Using the button "Add Supplier", you can create new suppliers and record their master data. Master data includes name, address, contact details, and optional internal notes. Existing suppliers can be edited or deleted at any time.
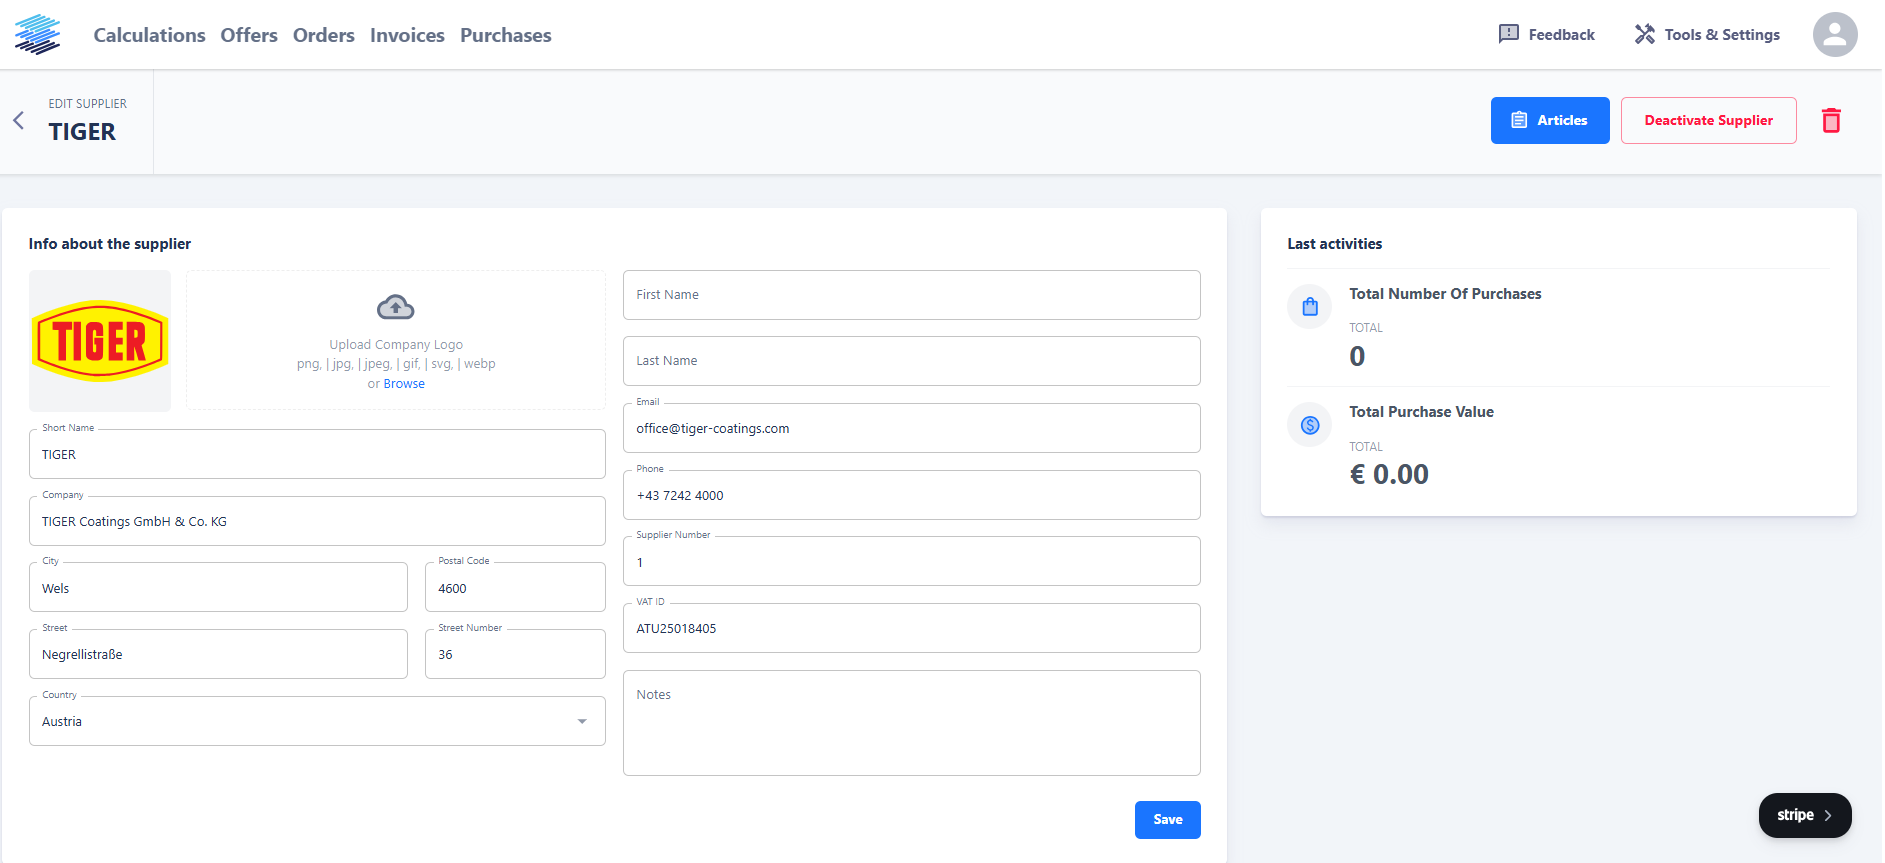
When you click on a supplier, their detail view opens. Here you can see an overview of activities and edit the stored information.
Under the tab "Articles", you manage the articles associated with this supplier. Each supplier can have multiple articles, and each article can be listed in several batch sizes. Batches define the lot sizes in which the article is offered by the supplier. This information is important to ensure that material requirements and purchase suggestions consider realistic quantities.
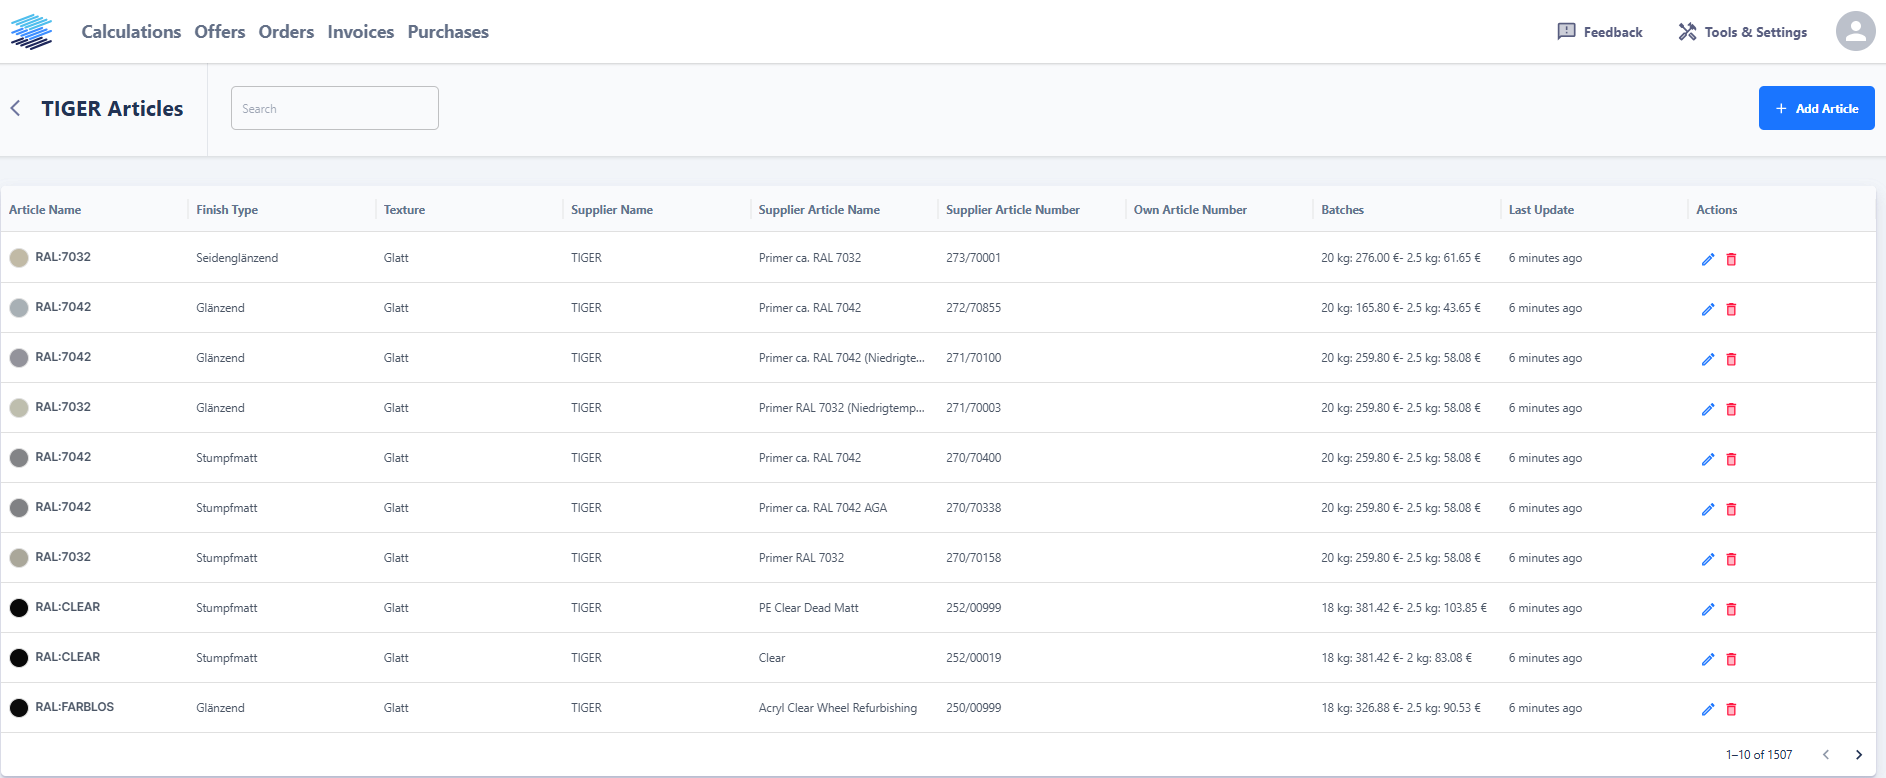
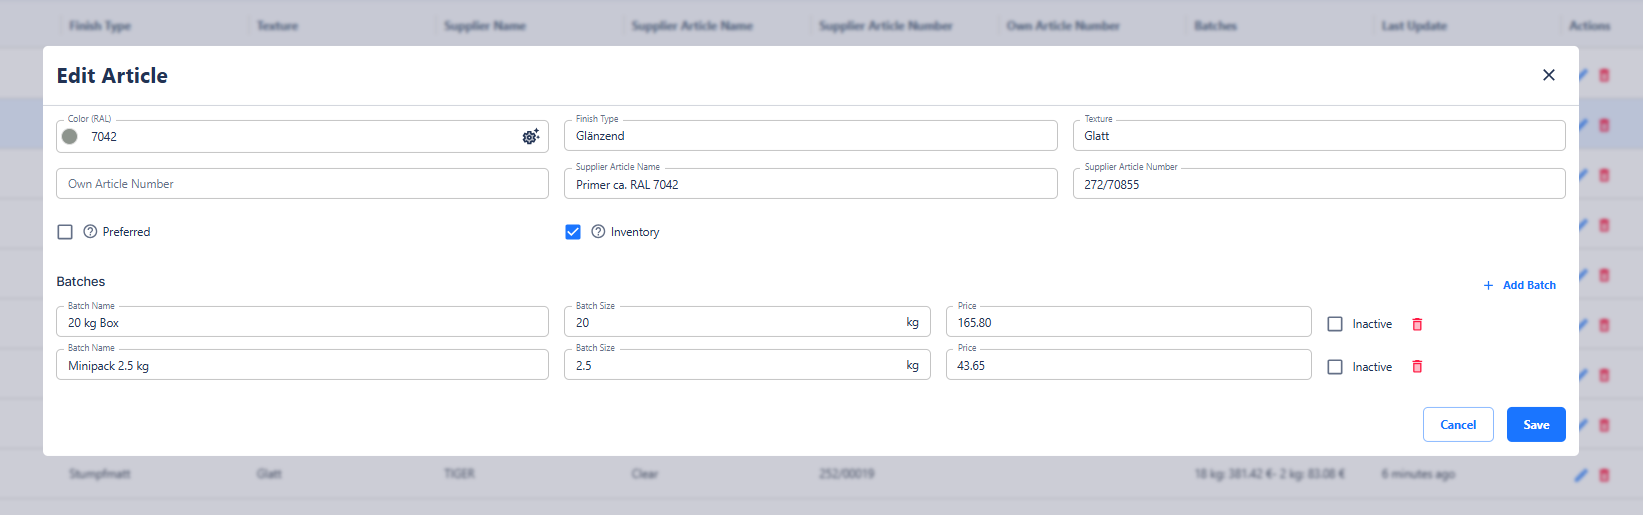
For each article, the following information can be maintained:
-
Article name, color code, color system, gloss level, and surface structure
-
Batches, i.e., the available lot sizes
-
Preferred option: If an article is marked as preferred, it will be prioritized in automatic purchase suggestions, even if its price is higher than competing products.
This way, you always maintain a clear overview of your suppliers and the materials they offer.
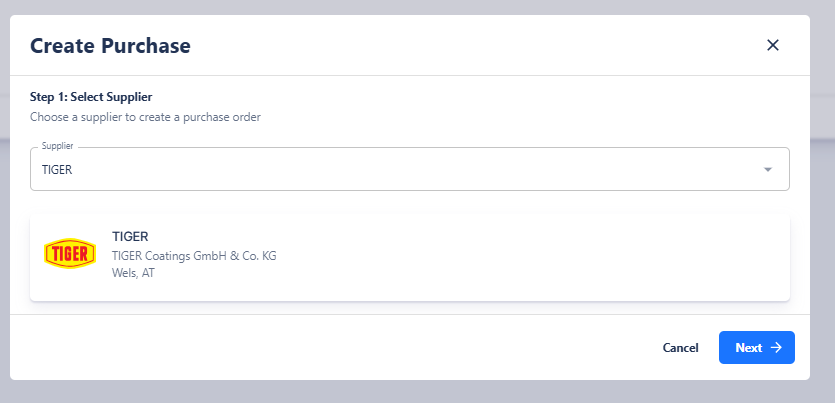
Create Purchases
To create a new purchase, navigate in the main menu to the "Purchase" section and click the "Create Purchase" button. You will then be guided step by step through the purchase process.
1. Select Supplier
In the first step, select the desired supplier. The list of available suppliers is based on the entries you previously created in Supplier Management. Once you select a supplier, their articles will automatically become available in the next step.
2. Select Articles and Batches
In the second step, specify which articles you want to purchase. For each article, you can:
-
specify the desired quantity,
-
select the batch size,
-
and, if needed, add additional notes.
This allows precise control over which materials are purchased and in which batch sizes. The selection automatically takes into account the batches and article information stored for the supplier.

Generate Purchase
After all articles are selected and quantities defined, you can confirm the purchase. You will then enter the Purchase Editor, where the purchase can be further edited or finalized. In this editor, the purchase can:
-
be generated as a PDF document,
-
be reviewed or adjusted if necessary,
-
and sent directly via email to the selected supplier.
The PDF document is structured similarly to the familiar offer and invoice templates and automatically contains all relevant information about the purchase, including article overview, quantities, and contact details.
In this way, purchases can be created and sent quickly, transparently, and with minimal effort directly from the system.

Material Requirements List
The Material Requirements page allows you to review the materials needed for your purchases and directly generate the optimal purchases. You can access this page by selecting "Tools & Settings" in the main menu and then clicking on "Requirements List".
The interface is divided into two sections:
-
Left Side – Requirements List:
Here you see all the materials required for your purchase. For each item, quantities, article information, and current stock levels are displayed. Additionally, you can select individual items to determine which materials should be included in the purchase suggestions. -
Right Side – Purchase Suggestions:
Based on the selected materials on the left, the system automatically generates an optimized compilation of purchases. The goal is to cover the entire material requirement while minimizing costs. Identical colors are combined, and the best combination of available suppliers and batch sizes is suggested.

Optimization Algorithm
The material requirements are analyzed intelligently:
-
Materials from different purchases are combined to avoid duplicate purchases.
-
The purchase suggestions take into account the optimal quantities that different suppliers can deliver, resulting in minimal total costs.
-
It is ensured that within one purchase, the same color is not sourced from different suppliers, ensuring consistency and deliverability.
Purchase from the Material Requirements
From the purchase suggestion list on the right, you can directly create purchases. This allows required materials to be purchased with just a few clicks, without manually compiling suppliers or articles.
Additional Features
-
Low stock levels are displayed, allowing you to quickly identify which materials need to be repurchased.
-
You can selectively remove or mark individual materials from the suggestions to customize purchases.
The Material Requirements page thus provides an intelligent, cost-optimized overview that allows you to control material flow while maximizing the efficiency of your purchases.
Inventory management
Overview
The inventory management in Surface Solutions serves as the central hub for maintaining and organizing all materials and colors in your company. It forms the basis for calculations, offers, orders, and automated requirements determination.
In inventory management, all important information about your materials is recorded and monitored: name, gloss level, surface structure, price per kilogram, stock level, reserved quantities, quantities in delivery, minimum stock level, and minimum purchase quantities.
Inventory management thus ensures that all materials are always available, stock levels are monitored transparently, and purchases can be executed efficiently based on an optimized algorithm.
Inventory Management
The inventory management in Surface Solutions is the central tool for maintaining, monitoring, and organizing all materials and colors used in your company. It ensures that materials are always available, correctly calculated, and that stock levels are managed transparently and efficiently.
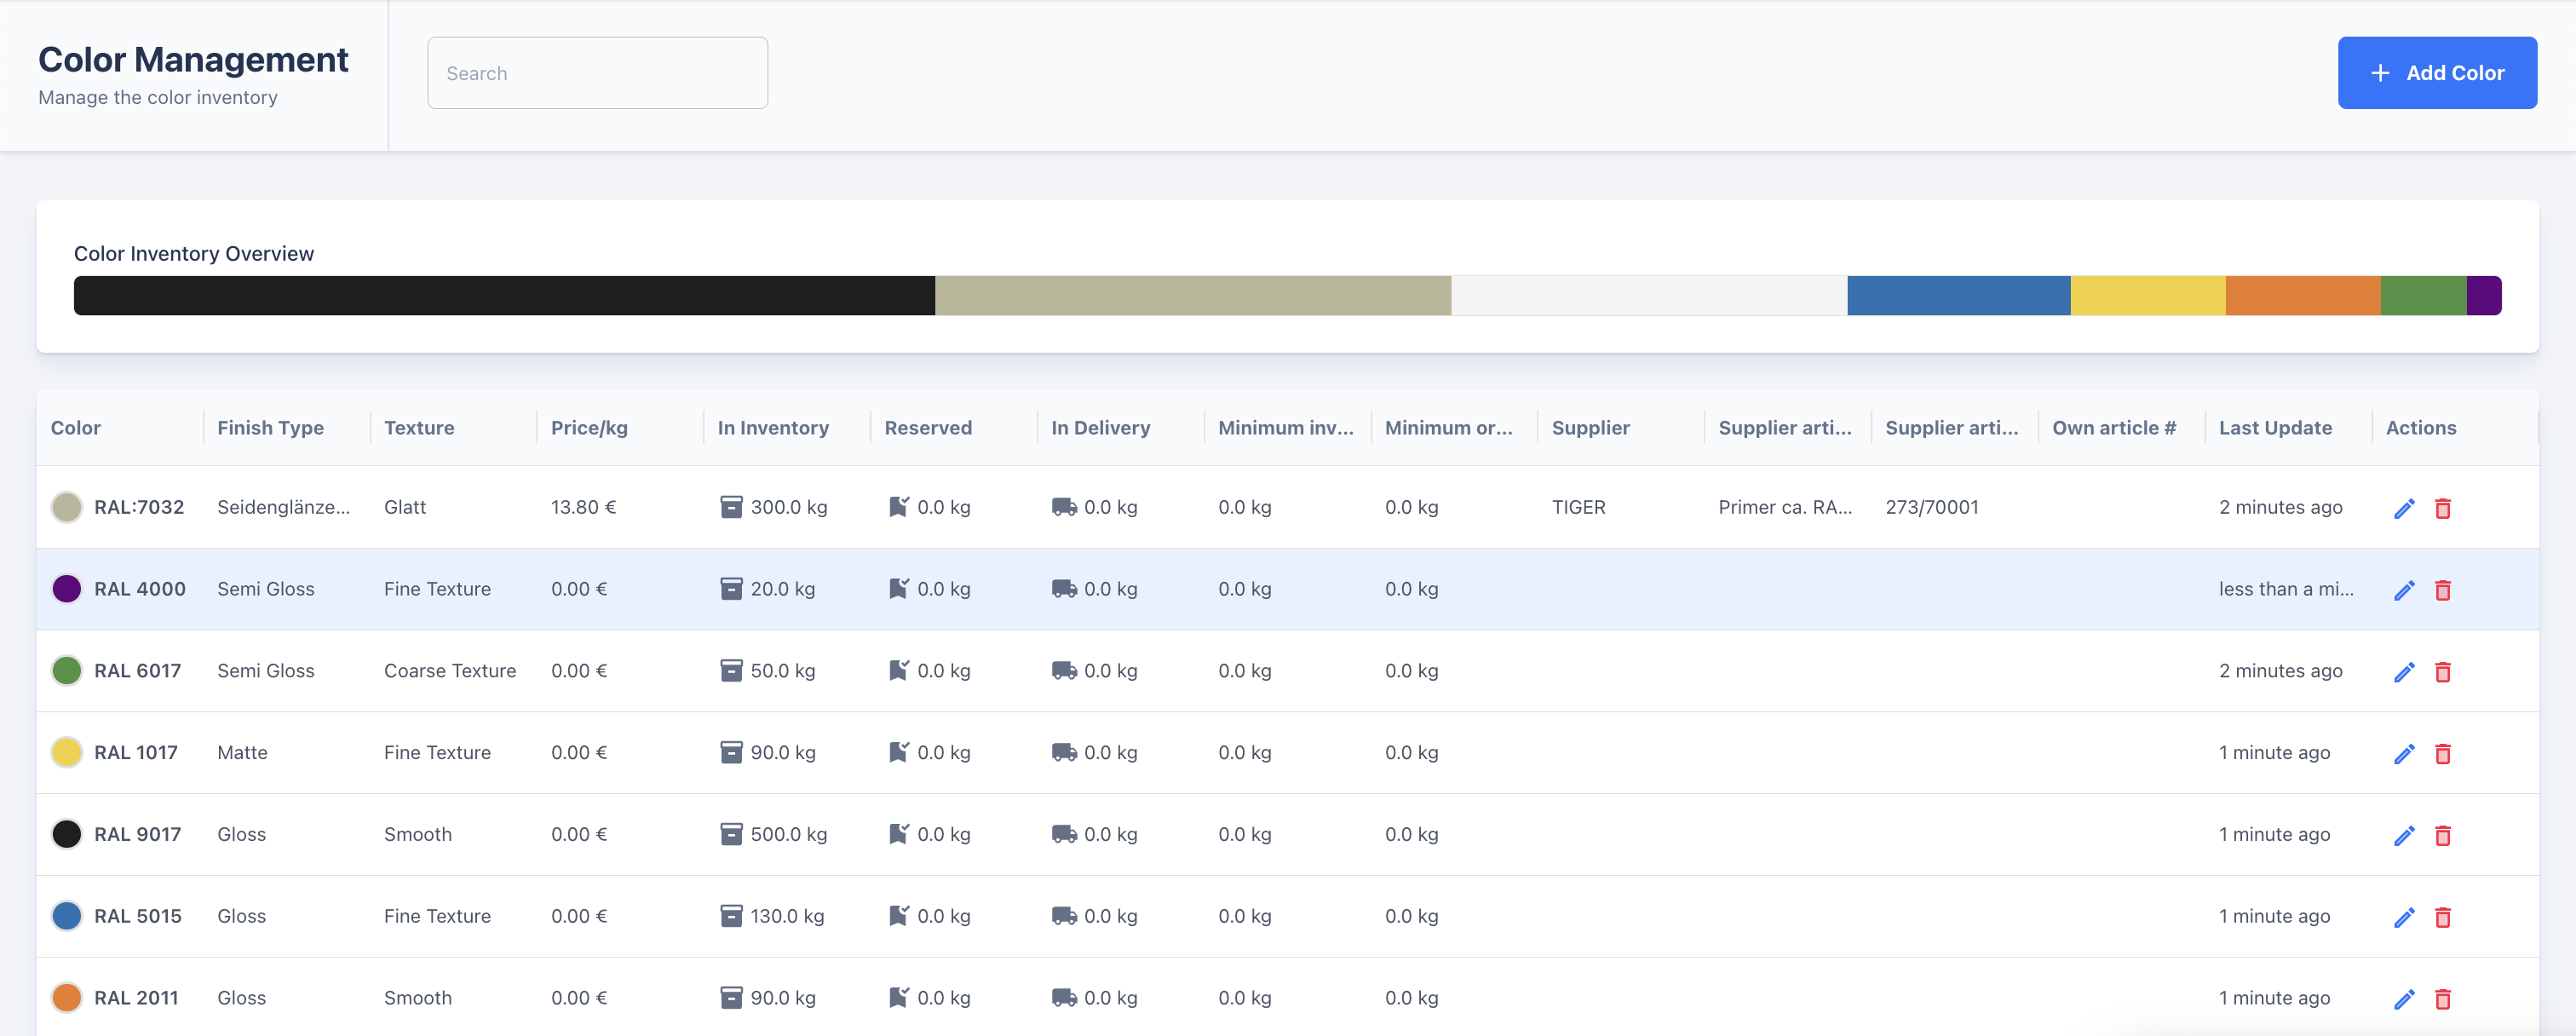
With inventory management, you can:
-
Create and manage new materials and colors
-
Edit article information, including name, gloss level, surface structure, and price per kilogram
-
Monitor stock levels, manage reserved quantities, and incoming deliveries
-
Set minimum stock levels and minimum order quantities to avoid shortages
-
Link articles with supplier information and preferred order settings
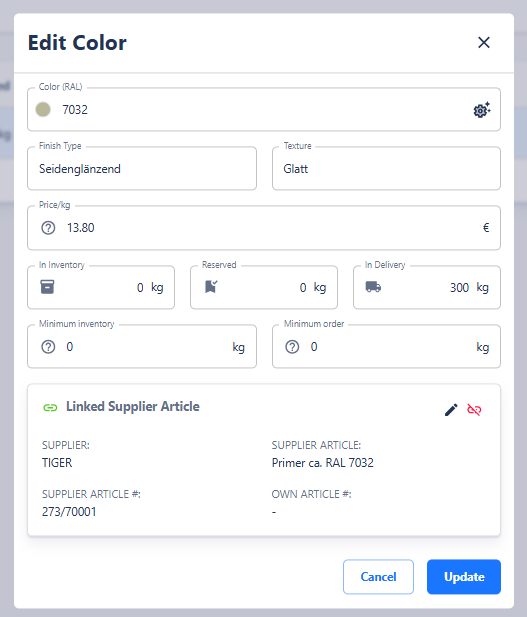
Stock Levels and Calculation
The available stock of an article is automatically calculated using the following formula:
Available Stock = Stock - Reserved Quantity + Quantity in Delivery
-
Stock: Quantity physically available in the warehouse
-
Reserved Quantity: Quantities already allocated for orders and therefore not available for new orders or purchases
-
Quantity in Delivery: Quantities that have been ordered but have not yet arrived in the warehouse
If the available stock falls below the defined minimum stock level, the article is automatically added to the requirements list. This ensures that materials can be repurchased in time.
Reservations and Deliveries
-
As soon as a purchase is created or material requirements are added, the corresponding quantities are automatically marked as reserved and deducted from the available stock.
-
Incoming deliveries automatically increase the stock levels.
-
This calculation ensures that stock levels always reflect the current material flow correctly and prevents double reservations.
Purchase Optimization
Inventory management is closely linked with the requirements list. Based on current stock levels, reserved quantities, and deliveries, the system automatically generates purchase suggestions that meet material requirements while minimizing costs. Articles of the same color are grouped to make purchasing as efficient as possible.
Through this automated calculation and monitoring of stock levels, inventory management provides a central solution to plan materials optimally, avoid shortages, and optimize purchasing costs.
Document definition
Overview
Through the document definition in Surface Solutions, you can control the contents of all automatically generated documents within your organization.
Here you define how invoices, offers, orders, and emails look, which information is included by default, and how number ranges or tax rates are assigned.
This ensures that all documents – regardless of which user creates them – are generated consistently, correctly, and in the desired corporate design.
With the document definition, you can:
-
Centrally define your organization’s logo, PDF background, and contact information.
-
Define number ranges for different document types (invoices, credit notes, offers, orders).
-
Manage tax rates and VAT notes.
-
Configure standard positions for offers to automatically print surcharges or overarching costs.
-
Manage text elements such as payment terms, delivery terms, footers, and general notes.
-
Store standard texts and attachments for emails, including CC recipients and signatures.
The document definition is modular and divided into several sections:
- Document Definition for Invoices and Credit Notes
Here you define all contents, layouts, and logics that apply to invoices, cancellation invoices, and credit notes.
In addition to general information such as logo and background, you can configure tax rates, number ranges, and legal notices. - Document Definition for offers
In this section, you define which information and layouts are used for offers.
A central element is the standard positions, which allow you to automatically print additional surcharges or summary values such as material costs, setup costs, or color changes. - Document Definition for Orders
Here the standard information for orders is maintained – such as sender, billing, and delivery addresses, delivery terms, and general notes.
Additionally, you can individually define the number range for orders. - Document Definition for Emails
In this section, you control the standard texts and attachments for emails used when sending documents.
You can define subject, message, CC recipients, and standard attachments per document type. Additionally, a personal email signature can be set for each user.
By combining these four sections, the document definition provides a comprehensive solution to standardize all business documents in Surface Solutions in terms of content, visuals, and structure.
This gives you full control over the appearance of your documents while ensuring consistent processes and legal compliance across the organization.
Document Definition for Invoices & Credit Notes
In the document definition, you determine how all documents generated by Surface Solutions appear and which standard information they contain. This applies to invoices, cancellation invoices, credit notes, purchase orders, and emails. Through the document definition, you can define the content, layout, logo, and background for PDFs.
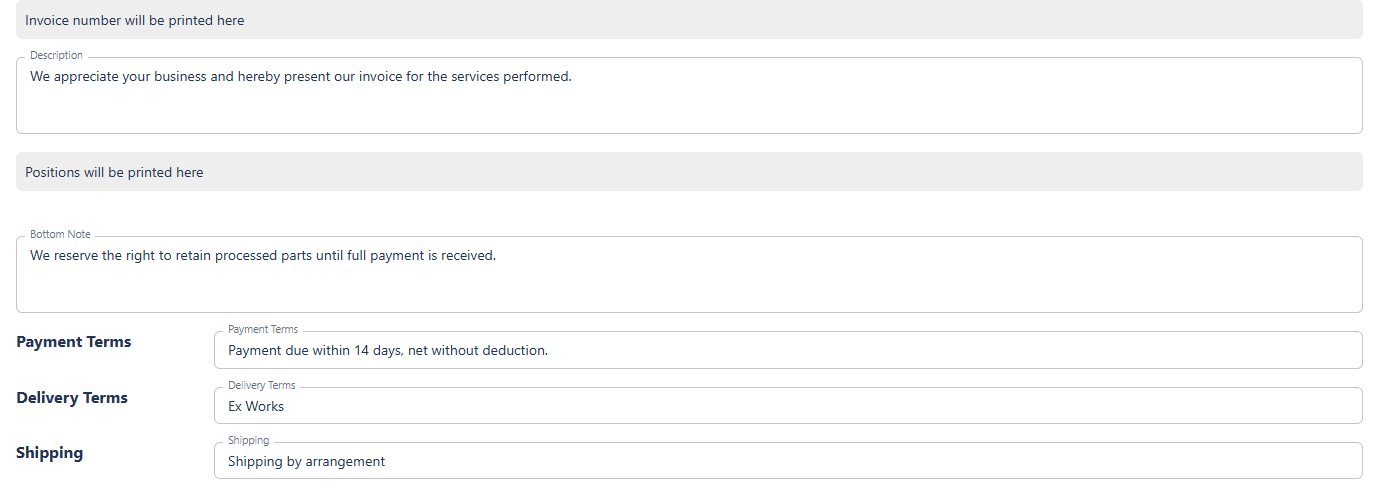
Invoice
Under the “Invoice” tab, you can edit all information relevant to invoices. The settings you make here also apply to cancellation invoices and credit notes. These include:
-
Logo and Background: You can define a separate logo and background for each type of document.
-
Standard Information: This includes the organization’s contact details, standard texts, notes, payment terms, footer, SEPA information, and QR code. These default values are automatically applied to all created invoices, but can be overridden for individual invoices if necessary.
-
Positions: Standard positions can be automatically added from the document definition. They can be edited or deleted in the invoice editor if needed.
Tax Rates
In this section, you define which VAT rates are suggested in the system. Each tax rate includes the following fields:
-
Internal Title: An internal name that is not displayed on the invoice but serves internal classification purposes.
-
Displayed Tax Rate: The name shown on the invoice in the line items (e.g., “19% VAT”).
-
Tax Rate Percentage: The percentage applied when calculating the tax.
-
VAT Note: An optional note, e.g., for cases where VAT is not shown, such as reverse charge procedures.
-
Show Tax Rate on Invoice: A checkbox determining whether the tax rate is displayed on the invoice. For standard domestic VAT, this is typically enabled; for special cases such as reverse charge, it should be disabled.
Additionally, you can define which tax rate should be used by default for domestic customers, EU customers, and non-EU (third-country) customers.

Invoice Number
Here you define the invoice numbering series. You can customize the invoice number format and use placeholders. The page displays a preview of the next number to be assigned. For mid-year changes, you can set the last issued sequence number so that numbering remains continuous.

Use placeholders to customize your number range.
{seq:######}for the sequence number. The number of#defines the number of leading zeros. Use{seq:#}to use no leading zeros.{yyyy}for the four-digit year.{yy}for the two-digit year.{M}for the month, single digit (e.g., 9, 10).{MM}for the month, two digits (e.g., 09, 10).{MMM}for the month, abbreviated (e.g., Oct).{MMMM}for the month, full name (e.g., October).{Q}for the quarter (e.g., 1).Format examples:
R-{yyyy}/Q{Q}-{seq:########}→R-2026/Q4-00001234INV{yy}/{MM}/{seq:#}→INV26/12/1234{yyyy}-{seq:######}→2026-001234
Credit Note Number
Similar to the invoice number, you can define the credit note numbering series here. Credit notes use their own numbering sequence that runs independently from invoices. The format and placeholders work the same way as for invoices.
Document Definition for Offers
The document definition for offers in Surface Solutions allows you to centrally control the layout, content, and default values for all offers. This applies to all offers created within the organization. Through the document definition, you specify which information should appear by default on each offer, which logo and PDF background are used, and which standard positions are automatically inserted.
The settings apply to all offers in the organization that are created based on a calculation. At the same time, certain values in the offer editor can be overwritten per offer — for example, contact details, prices, or visible positions.
Logo and PDF Background
For offers, you can set a specific logo and PDF background. These apply by default to all offers in the organization, including follow-up offers. This ensures that each offer has a consistent appearance.
Contact Information and Standard Details
In this section, you can define key information that should appear on every offer:
-
Contact person and contact details
-
Return address
-
Phone number and email
-
Footer
-
Payment and delivery terms
-
Shipping information
-
General notes
These standard details are automatically included in the offer editor but can be modified or extended for individual offers if needed. This ensures that all offers contain the required information while remaining flexible.
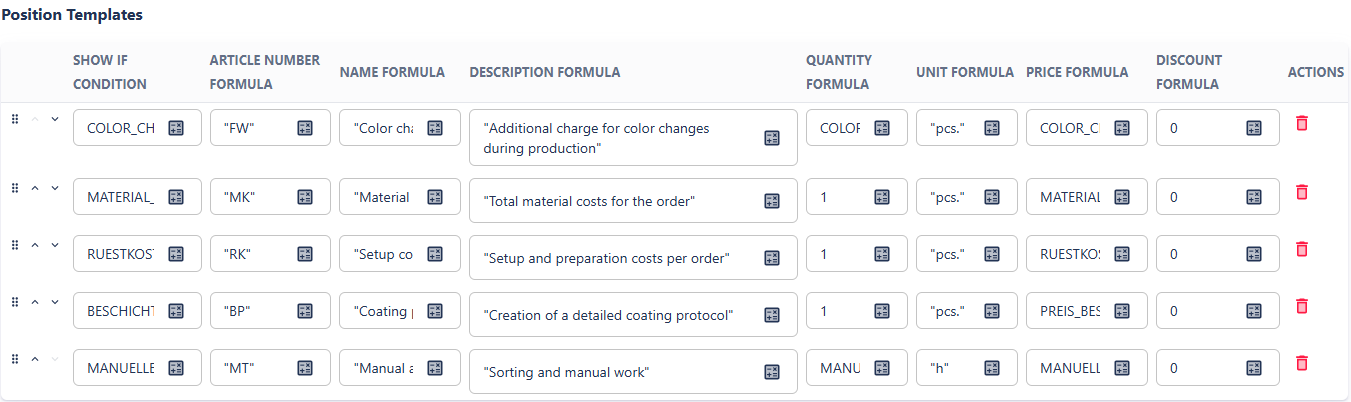
Standard Positions
Standard positions are one of the most important features of the document definition for offers. They allow you to automatically print additional positions on each offer that do not originate directly from the calculation. This is especially useful for surcharges or lump sums that apply to the overall offer, such as:
-
Total material costs
-
Number of color changes
-
Setup costs
Note: Setup costs are a common example of a standard position because they are calculated once for the entire offer and cannot be distributed among individual positions.
Features of standard positions:
-
Automatic Integration: All standard positions are automatically included in the offer editor. Users can delete them if they should not be displayed.
-
Access to Summary Template Variables: Standard positions can access only variables from the calculation’s summary template.
-
Price Calculation: The “Price” field can reference a variable directly or define its own formula, which can combine multiple variables (e.g.,
MATERIALCOSTS). -
Visibility: Each standard position can have a visibility condition defined as a formula. If the condition evaluates to
TRUE, the line appears on the offer. Multiple conditions can be combined withAND/OR. -
Flexibility: Standard positions enable the application of costs to the overall result without requiring changes to each position individually. They are ideal for flat-rate costs, additional efforts, or percentage-based surcharges.
Other general costs and surcharges not covered by standard positions are proportionally distributed among the calculation’s existing positions.
Example of Using Standard Positions: Consider a calculation with two positions (Component A and Component B) and a summary template defining a 5% administrative surcharge.
Calculation
Position A 1 pcs € 100,- Position B 1 pcs € 200,- Administrative surcharge 5% € 15,- Total € 315,- If you do not use standard positions, the administrative surcharge is proportionally distributed:
Offer without Standard Position
Position A 1 pcs € 105,- Position B 1 pcs € 210,- Total € 315,- If you add a standard position referencing the variable
SUM_POSITION_PRICESfrom the summary template, you get a offer with a listed surcharge:
'5% Administrative Surcharge' SUM_TOTAL_POSITION_PRICES * 0.05 Offer with Standard Position
Position Quantity Price Position A 1 pcs € 100,- Position B 1 pcs € 200,- 5% Administrative surcharge € 15,- Total € 315,-
Offer Number
The offer number is managed through its own numbering sequence, independent of invoices or credit notes.
-
Number Format: You can define the format of the offer number per organization, e.g., sequential numbers, year, or quarter identifiers.
-
Preview: On the right-hand side of the page, you can see a preview of the next available offer number.

Document Definition for Purchase Orders
The Document Definition for Purchase Orders specifies how purchase orders generated from Surface Solutions are structured in terms of content and appearance. As with other document types (e.g., offers or invoices), all standard information can be maintained centrally, ensuring that each purchase order is consistent and automatically includes the correct sender and address details.
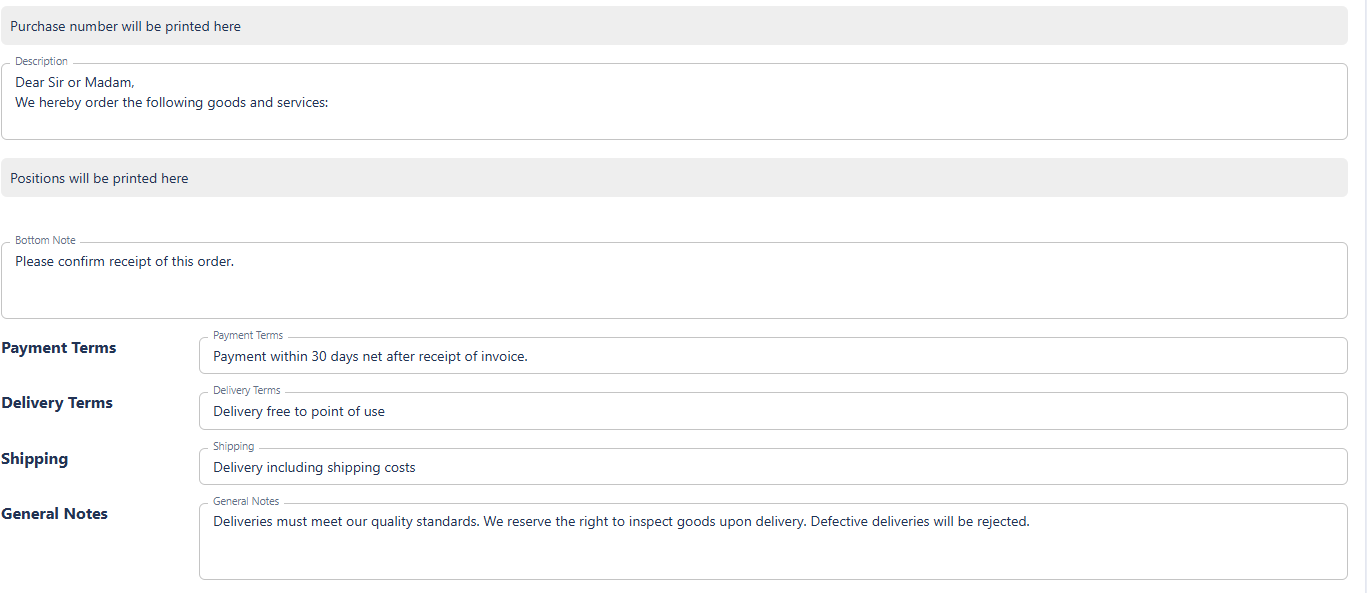
Purchase Order
Under the Purchase Order section, the basic details that apply to all of the organization’s purchase orders are defined:
-
Logo and PDF background:
A separate logo and PDF background can be set for purchase orders. This allows purchase orders to differ visually from offers or invoices — for example, when different colors or branding are desired. -
Sender address, billing address, and delivery address:
A key feature of the purchase order definition is the separate management of these three address types.
This enables you to, for example, use a central billing address but specify a project-specific delivery address. These addresses are inserted automatically when creating a purchase order, but can be adjusted in the order form. -
Delivery terms, notes, and footer:
As with other documents, standard texts such as delivery terms, payment conditions, shipping information, or general notes can be stored here. These are automatically included on every purchase order to ensure a consistent external appearance.
Purchase Order Number
Similar to other document types, purchase orders have their own number sequence, which is defined in the Purchase Order Number section.
Here you can:
-
define the format of the purchase order number using placeholders,
-
view a preview of the next number, and
-
seamlessly continue existing numbering sequences if migrating from another system.
The numbering is assigned automatically when the purchase order is finalized, ensuring a unique identifier for every order.
Document Definition for Emails
In the document definition for emails, you can specify how the automatically generated emails from Surface Solutions are structured by default when sending documents such as invoices, offers, or orders. These settings enable consistent and professional communication with your customers without requiring manual adjustments for each sending.
Email Templates for Documents
In the Email section, you can define for each document type (e.g., invoice, offer, order, credit note) which content should be used by default when sending. This particularly includes:
-
Subject of the email, which is pre-filled automatically upon sending.
-
Message text that forms the email content.
-
CC recipients that should automatically be added to each email.
-
Standard attachments that are sent automatically.
This allows, for example, to specify that a certain accompanying message is automatically used for every offer, the accounting department is added as a CC recipient for every invoice, or that an additional information sheet is attached to every order.
Standard Attachments
For each document type, any number of standard attachments can be stored. These are automatically inserted when sending the email.
A typical use case is the automatic sending of the terms and conditions (T&Cs), data sheets, or technical attachments with certain documents.

CC Recipients
CC field, one or more email addresses can be entered, which will automatically be added in copy to every email of the same document type.
This is useful, for example, to ensure that the accounting department or a specific internal contact automatically receives all sent invoices or offers.
All email settings apply organization-wide by default, but can be individually adjusted during actual sending, as Surface Solutions opens the respective local email client.
Email Signature
At the end of the section, the email signature can be defined.
Unlike the other settings, this applies at the user level – meaning each user can store their personal signature here, which is used for their own emails.
This ensures that communication remains both consistent with the organization’s style and individually personalized for the respective sender.